通过 Vue.js 实现动态表单一次提交多个咖啡店位置信息
上一篇教程中,我们创建了相应的数据表结构来存储咖啡店与冲泡方法的多对多关联以及获取方法,现在我们需要在其基础上来调整新增咖啡店表单:由于一个咖啡店可能有多个分店,我们可能需要多个位置字段(具体数目未知),因此需要一个动态表单。通过 Vue.js 我们可以轻松实现这样的动态表单。
第一步:构思新的 NewCafe.vue 组件功能
很显然,我们需要对 NewCafe.vue 表单组件进行重构,在此之前,需要先构思下我们要实现什么样的功能。
我们已经实现了新增咖啡店功能,但是这个表单只支持单个地理位置,而有些咖啡店可能散布在多个地方(可以理解为多个分店),这些分店都有一个共同的父节点(可以理解为总店),它们共享同一个咖啡店名称、网址、简介等信息。每个咖啡店,不管是总店还是分店,都会支持多个冲泡方法,最后我们会将总店和分店信息分别存储到 cafes 表的不同记录中,并且以某种方式进行关联。
总店和分店区别主要体现在:
- 具体地址
- 位置名称(唯一标识位置)
- 冲泡方法
在具体的提交表单中,需要提供一个添加位置的按钮来添加标识咖啡店位置的字段以及移除位置的按钮来移除与之关联的位置字段,这样,发送给服务器的数据结构也将需要做相应的调整,因此,不仅仅是渲染表单的 HTML 需要调整,还需要调整 Vuex 模块方法和 API 调用,在上一篇教程中,我们已经设置好用于存放冲泡方法的 Vuex 模块 brewMethods,除此之外,还需要做如下这些调整:
- 保存咖啡店的分发动作
- 提交咖啡店到服务器端 JavaScript API
- 更新服务器端验证逻辑来接收新的表单数据
- 修改服务器端保存数据到数据库的业务逻辑
接下来,我们将按照这个思路一步一步完成本教程需要实现的动态表单提交功能。
第二步:开始编辑 NewCafe.vue 组件代码
打开 resources/assets/js/pages/NewCafe.vue 组件文件,首先需要从 data() 方法中移除老的地址相关字段,然后添加 locations 数组以及几个新的字段,同时从 validations 中移除老的验证字段并添加 locations 数组以及 oneLocation 等新字段验证规则,这样,新的 data() 方法代码如下:
data() {
   return {
       name: '',
       locations: [],
       website: '',
       description: '',
       roaster: false,
       validations: {
           name: {
               is_valid: true,
               text: ''
           },
           locations: [],
           oneLocation: {
               is_valid: true,
               text: ''
           },
           website: {
               is_valid: true,
               text: ''
           }
       }
   }
},
locations 数组用于存放所有新增的位置字段数据,validations 中的 locations 数组也会包含每个位置字段的验证规则,这样就能确保添加的每个位置字段数据都是有效的。oneLocation 验证规则用于确保咖啡店至少包含一个位置信息。而 website 和 description 都是新增的字段,用于表示咖啡店的网址和简介信息。
接下来,需要添加 addLocation() 方法到 methods 方法列表中,该方法用于新增一个位置区块到表单中,并在组件创建后进行调用,addLocation() 方法代码如下:
addLocation() {
    this.locations.push({name: '', address: '', city: '', state: '', zip: '', methodsAvailable: []});
    this.validations.locations.push({
        address: {
            is_valid: true,
            text: ''
        },
        city: {
            is_valid: true,
            text: ''
        },
        state: {
            is_valid: true,
            text: ''
        },
        zip: {
            is_valid: true,
            text: ''
        }
    });
},
该方法所做的事情就是将一个位置对象推送到 locations 字段,其中包含名称、地址、城市、省份和邮编以及有效的冲泡方法数组,然后将位置对象中的某些字段验证规则推送到 validations.locations 字段,我们在验证规则中去掉了 name 和 methodsAvailable 属性,这是因为对 name 字段而言,如果空的话,我们将使用咖啡店已经存在的名称字段,并且这个字段也不是必需的;而对 methodsAvailable 字段而言,当添加咖啡店时,你可能还不知道所有的冲泡方法。
这样,通过动态绑定,就可以在调用该方法时在表单中插入一个咖啡店位置填写区块了,我们在组件创建时调用上述方法来添加位置区块:
created(){
    this.addLocation();
},
这将会初始化我们的第一个位置(提交表单时至少有一个咖啡店位置,可以将这个位置作为总店位置,其他新增的位置作为分店位置)。
第三步:添加填充表单模板
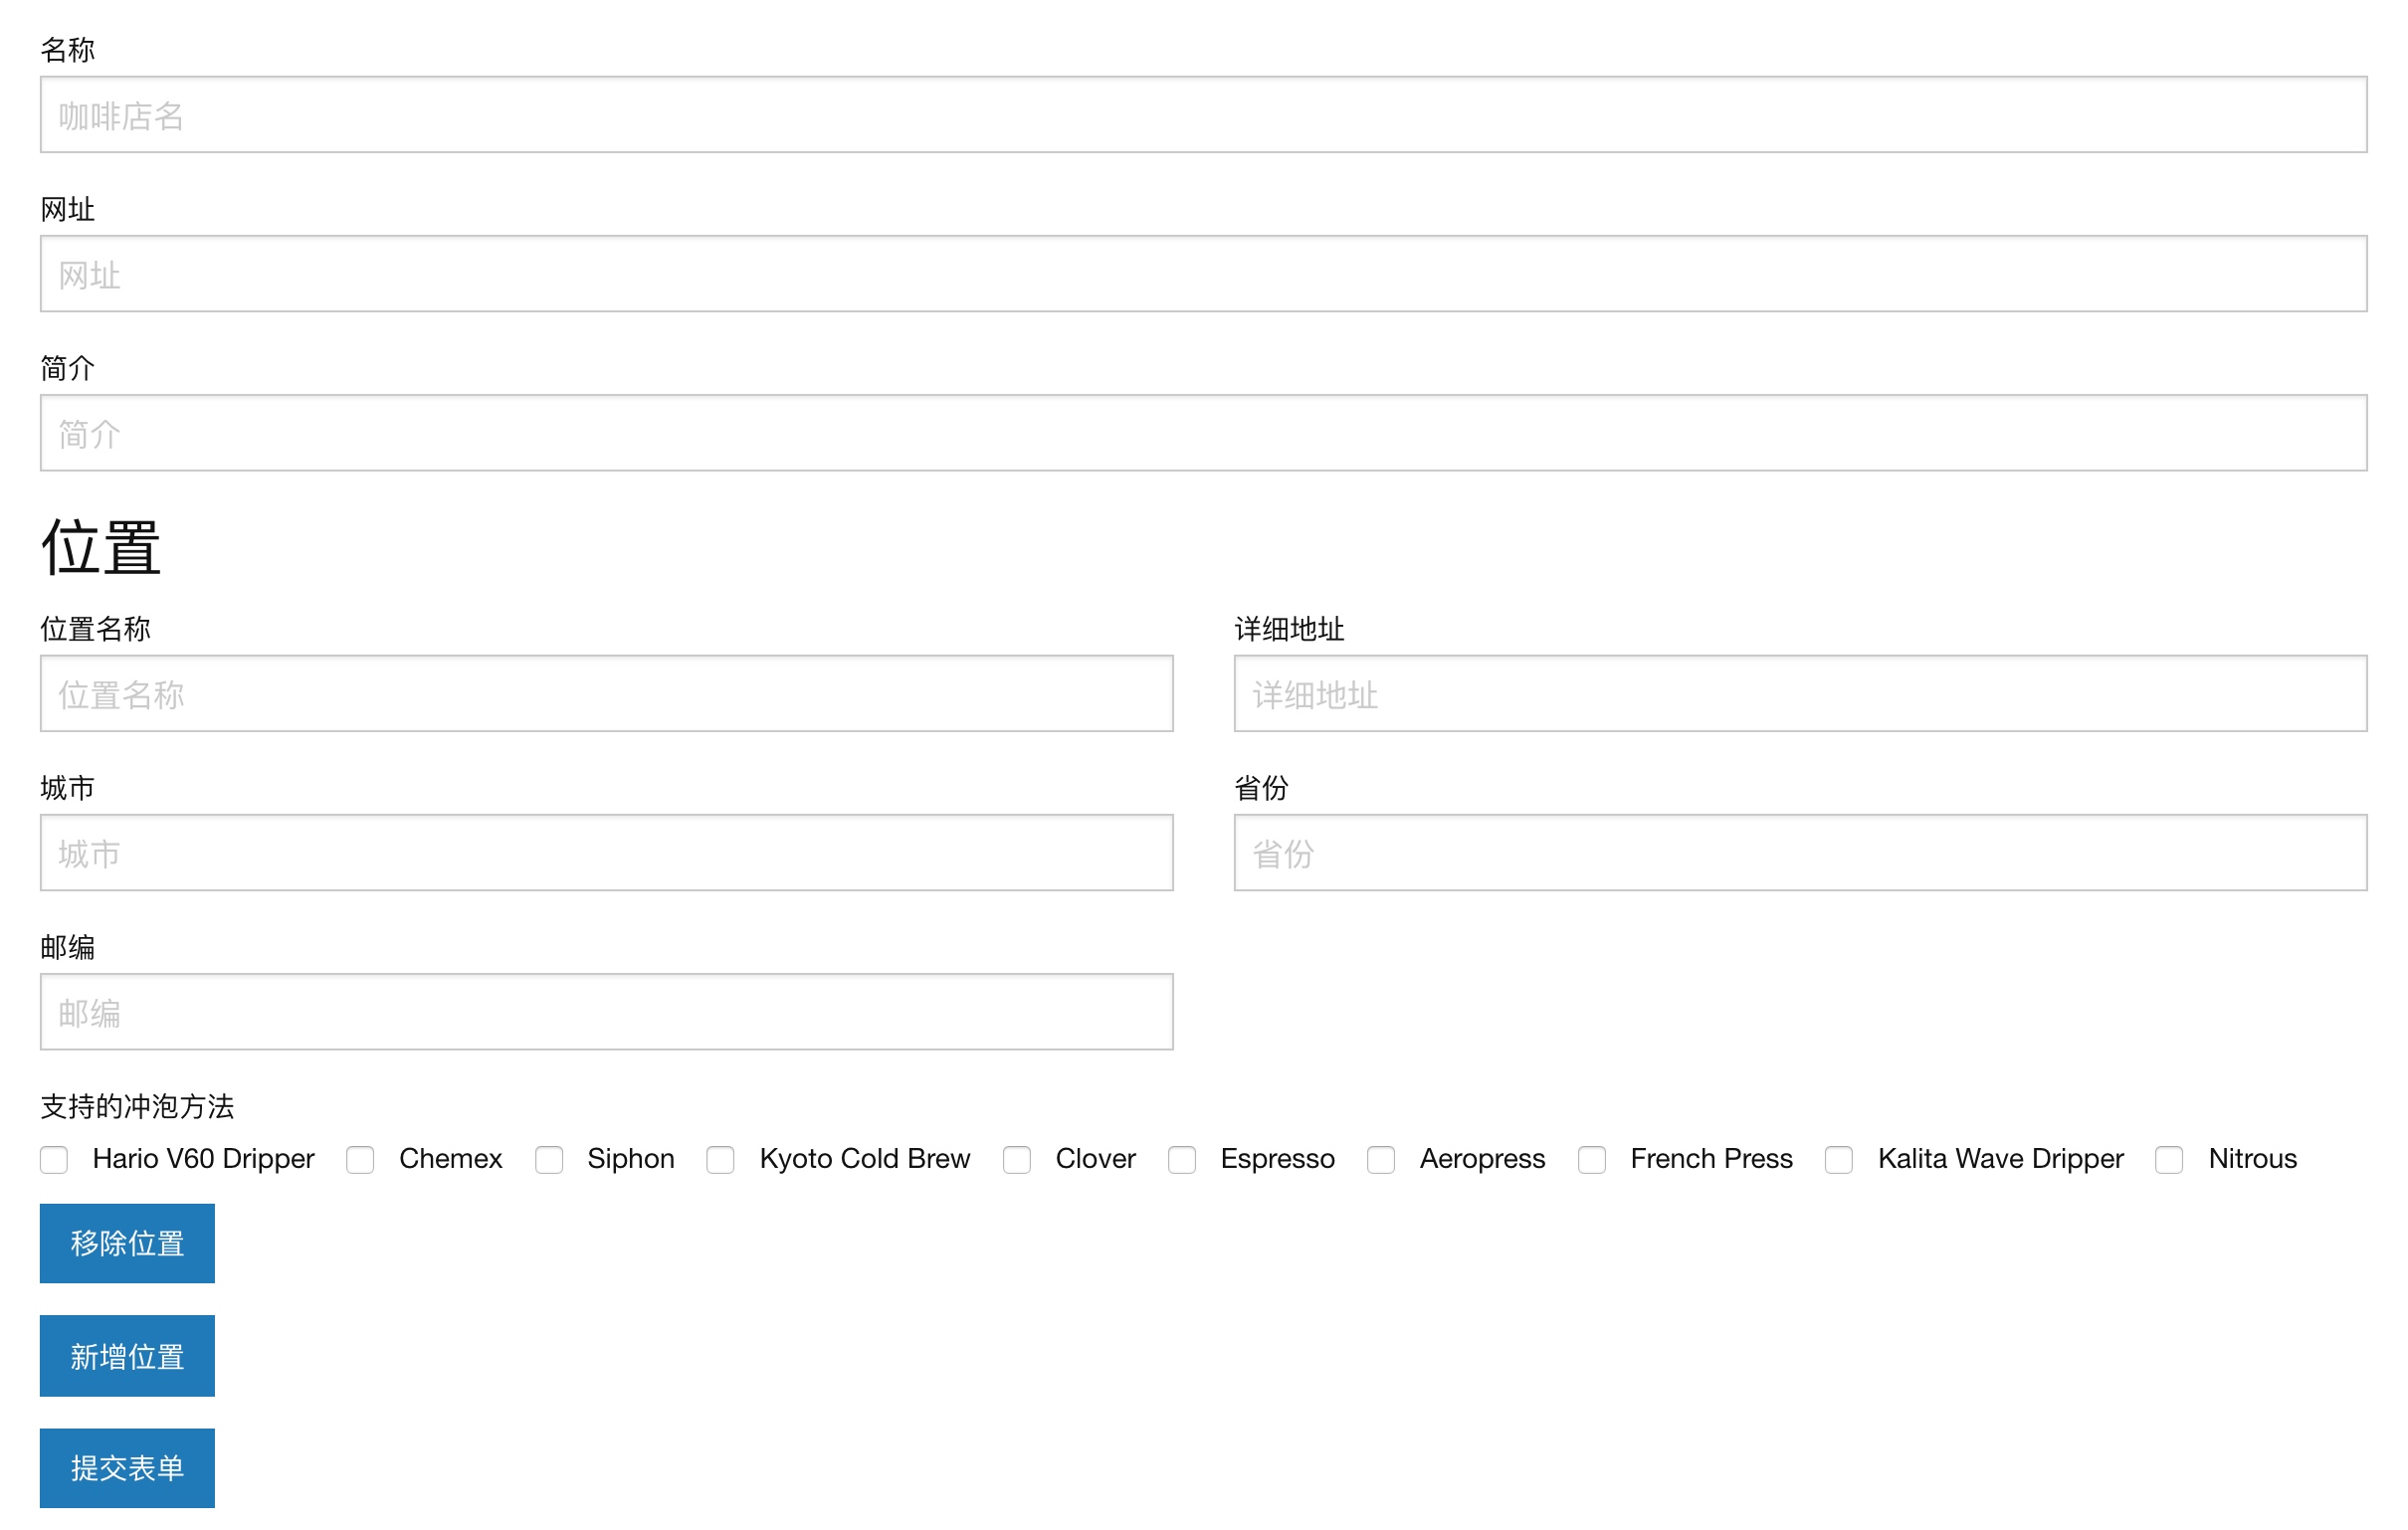
在这一步中,我们需要为所有输入字段定义一个可视化的显示模板,首先,我们将原来模板中的地址、城市、省份和邮编字段都删除,因为这些字段已经并入到位置模块里面,并且新增一些字段:
<div class="page">
    <form>
        <div class="grid-container">
            <div class="grid-x grid-padding-x">
                <div class="large-12 medium-12 small-12 cell">
                    <label>名称
                        <input type="text" placeholder="咖啡店名" v-model="name">
                    </label>
                    <span class="validation" v-show="!validations.name.is_valid">{{ validations.name.text }}</span>
                </div>
                <div class="large-12 medium-12 small-12 cell">
                    <label>网址
                        <input type="text" placeholder="网址" v-model="website">
                    </label>
                    <span class="validation" v-show="!validations.website.is_valid">{{ validations.website.text }}</span>
                </div>
                <div class="large-12 medium-12 small-12 cell">
                    <label>简介
                        <input type="text" placeholder="简介" v-model="description">
                    </label>
                </div>
            </div>
            <div class="grid-x grid-padding-x" v-for="(location, key) in locations">
                <div class="large-12 medium-12 small-12 cell">
                    <h3>位置</h3>
                </div>
                <div class="large-6 medium-6 small-12 cell">
                    <label>位置名称
                        <input type="text" placeholder="位置名称" v-model="locations[key].name">
                    </label>
                </div>
                <div class="large-6 medium-6 small-12 cell">
                    <label>详细地址
                        <input type="text" placeholder="详细地址" v-model="locations[key].address">
                    </label>
                    <span class="validation" v-show="!validations.locations[key].address.is_valid">{{ validations.locations[key].address.text }}</span>
                </div>
                <div class="large-6 medium-6 small-12 cell">
                    <label>城市
                        <input type="text" placeholder="城市" v-model="locations[key].city">
                    </label>
                    <span class="validation" v-show="!validations.locations[key].city.is_valid">{{ validations.locations[key].city.text }}</span>
                </div>
                <div class="large-6 medium-6 small-12 cell">
                    <label>省份
                        <input type="text" placeholder="省份" v-model="locations[key].state">
                    </label>
                    <span class="validation" v-show="!validations.locations[key].state.is_valid">{{ validations.locations[key].state.text }}</span>
                </div>
                <div class="large-6 medium-6 small-12 cell">
                    <label>邮编
                        <input type="text" placeholder="邮编" v-model="locations[key].zip">
                    </label>
                    <span class="validation" v-show="!validations.locations[key].zip.is_valid">{{ validations.locations[key].zip.text }}</span>
                </div>
                <div class="large-12 medium-12 small-12 cell">
                    <label>支持的冲泡方法</label>
                    <span class="brew-method" v-for="brewMethod in brewMethods">
                        <input v-bind:id="'brew-method-'+brewMethod.id+'-'+key" type="checkbox"
                               v-bind:value="brewMethod.id"
                               v-model="locations[key].methodsAvailable">
                        <label v-bind:for="'brew-method-'+brewMethod.id+'-'+key">{{ brewMethod.method }}</label>
                    </span>
                </div>
                <div class="large-12 medium-12 small-12 cell">
                    <a class="button" v-on:click="removeLocation(key)">移除位置</a>
                </div>
            </div>
            <div class="grid-x grid-padding-x">
                <div class="large-12 medium-12 small-12 cell">
                    <a class="button" v-on:click="addLocation()">新增位置</a>
                </div>
                <div class="large-12 medium-12 small-12 cell">
                    <a class="button" v-on:click="submitNewCafe()">提交表单</a>
                </div>
            </div>
        </div>
    </form>
</div>
这里我们所做的就是将模板中原来的那个只能设置单个位置信息的表单替换成一个可以动态新增/移除位置字段的表单。
首先我们来看下这段代码:
<div class="grid-x grid-padding-x" v-for="(location, key) in locations">它会遍历 locations 数组中的所有位置信息并解析 location 和 key 字段,分别表示位置数据和位置索引。我们会使用 key 来实现每个表单输入字段于数据模型的双向绑定:
<div class="large-6 medium-6 small-12 cell">
     <label>位置名称
         <input type="text" placeholder="位置名称" v-model="locations[key].name">
     </label>
</div>
locations[key].name 通过 key 引用了位置对象 locations 对应索引中的 name 属性值。所有其他位置字段的关联逻辑与此一致,不再赘述。此外,我们还通过相应的字段验证规则来决定是否显示对应字段验证错误信息:
<span class="validation" v-show="!validations.locations[key].address.is_valid">{{ validations.locations[key].address.text }}</span>在设置完咖啡店位置信息后,我们还渲染了支持的冲泡方法选择列表:
<div class="large-12 medium-12 small-12 cell">
    <label>支持的冲泡方法</label>
    <span class="brew-method" v-for="brewMethod in brewMethods">
        <input v-bind:id="'brew-method-'+brewMethod.id+'-'+key" type="checkbox" v-bind:value="brewMethod.id" v-model="locations[key].methodsAvailable">
        <label v-bind:for="'brew-method-'+brewMethod.id+'-'+key">{{ brewMethod.method }}</label>
    </span>
</div>
这里我们为某个分店支持的冲泡方法提供了选择列表:我们通过 v-model 将其和 locations[key].methodsAvailable 进行绑定,并通过遍历 brewMethods (查询冲泡方法 API 获取)动态设置每个复选框的 id 和 value 属性值。
最后,添加一个移除按钮来移除与之关联的位置信息:
<div class="large-12 medium-12 small-12 cell">
    <a class="button" v-on:click="removeLocation(key)">移除位置</a>
</div>
如果你一不小心添加了太多的位置信息,可以通过这个按钮逐个移除。点击该按钮会调用 removeLocation 方法并将位置索引 key 作为参数传入,然后通过 splice 从数组中删除指定 key 对应的位置数据和验证规则。需要将这个方法添加到 methods 对象中:
removeLocation(key) {
    this.locations.splice(key, 1);
    this.validations.locations.splice(key, 1);
},
在循环体之外,还定义了一个新增按钮来新增位置区块:
<div class="large-12 medium-12 small-12 cell">
    <a class="button" v-on:click="addLocation()">新增位置</a>
</div>
点击该按钮会调用 addLocation 方法在表单中插入位置区块。
第四步:在表单中引入冲泡方法数据
我们在上一步中已经遍历过 brewMethods 数组,该数组代表所有支持的冲泡方法数据,需要从上一篇教程定义的 Vuex 存储中获取,我们已经在 Layout.vue 中加载这个数据了,所以可以直接拿来使用,只需将其添加到计算属性中即可:
computed: {
    brewMethods() {
        return this.$store.getters.getBrewMethods;
    }
},
第五步:验证动态表单
由于我们可以给咖啡店添加任意数量的位置信息,因此验证动态表单最困难的部分就是不知道要验证多少数据,好在,我们已经准备好了 locations 字段及其验证规则数组来处理这些位置字段验证,为此需要重写 validateNewCafe 方法中的位置字段验证代码:
for (var index in this.locations) {
    if (this.locations.hasOwnProperty(index)) {
        // 确保地址字段不为空
        if (this.locations[index].address.trim() === '') {
            validNewCafeForm = false;
            this.validations.locations[index].address.is_valid = false;
            this.validations.locations[index].address.text = 'Please enter an address for the new cafe!';
        } else {
            this.validations.locations[index].address.is_valid = true;
            this.validations.locations[index].address.text = '';
        }
    }

    // 确保城市字段不为空
    if (this.locations[index].city.trim() === '') {
        validNewCafeForm = false;
        this.validations.locations[index].city.is_valid = false;
        this.validations.locations[index].city.text = 'Please enter a city for the new cafe!';
    } else {
        this.validations.locations[index].city.is_valid = true;
        this.validations.locations[index].city.text = '';
    }

    // 确保省份字段不为空
    if (this.locations[index].state.trim() === '') {
        validNewCafeForm = false;
        this.validations.locations[index].state.is_valid = false;
        this.validations.locations[index].state.text = 'Please enter a state for the new cafe!';
    } else {
        this.validations.locations[index].state.is_valid = true;
        this.validations.locations[index].state.text = '';
    }

    // 确保邮编字段不为空
    if (this.locations[index].zip.trim() === '' || !this.locations[index].zip.match(/(^\d{6}$)/)) {
        validNewCafeForm = false;
        this.validations.locations[index].zip.is_valid = false;
        this.validations.locations[index].zip.text = 'Please enter a valid zip code for the new cafe!';
    } else {
        this.validations.locations[index].zip.is_valid = true;
        this.validations.locations[index].zip.text = '';
    }
}
这段代码会遍历所有的位置数据并验证每个字段。具体的验证逻辑和之前一致,除此之外,还为 website 字段添加了 URL 验证规则:
// 确保网址是有效的 URL
if (this.website.trim !== '' && !this.website.match(/^((https?):\/\/)?([w|W]{3}\.)+[a-zA-Z0-9\-\.]{3,}\.[a-zA-Z]{2,}(\.[a-zA-Z]{2,})?$/)) {
    validNewCafeForm = false;
    this.validations.website.is_valid = false;
    this.validations.website.text = '请输入有效的网址 URL';
} else {
    this.validations.website.is_valid = true;
    this.validations.website.text = '';
}
description 字段可以为空,就不写验证规则了。
第六步:更新 addCafe 分发动作
接下来我们需要重写传递表单数据到 Vuex 动作的方法从而保存新的咖啡店数据,在 submitNewCafe() 方法中,我们需要添加额外的字段并重新组织地址字段信息:
submitNewCafe: function () {
    if (this.validateNewCafe()) {
        this.$store.dispatch('addCafe', {
            name: this.name,
            locations: this.locations,
            website: this.website,
            description: this.description,
            roaster: this.roaster
        });
    }
},
现在我们已经将所有位置信息以 locations 数组方式传递,并新增了 website、 description 和 roaster 参数,而冲泡方法则和每个位置信息一起放到了 locations 数组中。
第七步:更新 cafe.js API
更新完 addCafe 分发动作后,还需要调整 resources/assets/js/modules/cafes.js Vuex 模块中相应的调用后端 API 方法:
addCafe({commit, state, dispatch}, data) {
    commit('setCafeAddStatus', 1);

    CafeAPI.postAddNewCafe(data.name, data.locations, data.website, data.description, data.roaster)
        .then(function (response) {
            commit('setCafeAddStatus', 2);
            dispatch('loadCafes');
        })
        .catch(function () {
             commit('setCafeAddStatus', 3);
        });
}
然后打开 resources/assets/js/api/cafe.js,更新 postAddNewCafe API 请求:
postAddNewCafe: function (name, locations, website, description, roaster) {
    return axios.post(ROAST_CONFIG.API_URL + '/cafes',
       {
           name: name,
           locations: locations,
           website: website,
           description: description,
           roaster: roaster
       }
    );
}
这样我们就可以从客户端传递新的数据格式到服务器端,接下来需要调整服务器端请求验证规则及表单数据获取逻辑。
第八步:更新服务端验证规则
打开 app/Http/Requests/StoreCafeRequest.php 文件,更新请求参数验证规则如下,我们使用了 * 来验证数组数据:
public function rules()
{
    return [
        'name'         => 'required',
        'location.*.address'      => 'required',
        'location.*.city'         => 'required',
        'location.*.state'        => 'required',
        'location.*.zip'          => 'required|regex:/\b\d{6}\b/',
        'location.*.brew_methods' => 'sometimes|array',
        'website'      => 'sometimes|url'
    ];
}
相应的,调整验证失败消息自定义规则如下:
public function messages()
{
    return [
        'name.required'     => '咖啡店名字不能为空',
        'name.min'    => '咖啡店名不能小于2个字符',
        'location.*.address.required'  => '咖啡店地址不能为空',
        'location.*.city.required'     => '咖啡店所在城市不能为空',
        'location.*.state.required'    => '咖啡店所在省份不能为空',
        'location.*.zip.required'      => '咖啡店邮编不能为空',
        'location.*.zip.regex'         => '无效的邮政编码',
        'location.*.brew_methods.array' => '无效的冲泡方法',
        'website.url' => '无效的咖啡店网址'
    ];
}
第九步:保存新的表单请求数据
表单数据验证完成之后,需要将数据保存到数据库。下面我们来定义请求表单数据获取及处理逻辑,打开 app/Http/Controllers/API/CafesController.php 文件,修改 postNewCafe 方法如下:
public function postNewCafe(StoreCafeRequest $request)
{
    // 已添加的咖啡店
    $addedCafes = [];
    // 所有位置信息
    $locations = $request->input('locations');

    // 父节点(可理解为总店)
    $parentCafe = new Cafe();

    // 咖啡店名称
    $parentCafe->name = $request->input('name');
    // 分店位置名称
    $parentCafe->location_name = $locations[0]['name'] ?: '';
    // 分店地址
    $parentCafe->address = $locations[0]['address'];
    // 所在城市
    $parentCafe->city = $locations[0]['city'];
    // 所在省份
    $parentCafe->state = $locations[0]['state'];
    // 邮政编码
    $parentCafe->zip = $locations[0]['zip'];
    $coordinates = GaodeMaps::geocodeAddress($parentCafe->address, $parentCafe->city, $parentCafe->state);
    // 纬度
    $parentCafe->latitude = $coordinates['lat'];
    // 经度
    $parentCafe->longitude = $coordinates['lng'];
    // 咖啡烘焙师
    $parentCafe->roaster = $request->input('roaster') ? 1 : 0;
    // 咖啡店网址
    $parentCafe->website = $request->input('website');
    // 描述信息
    $parentCafe->description = $request->input('description') ?: '';
    // 添加者
    $parentCafe->added_by = $request->user()->id;
    $parentCafe->save();

    // 冲泡方法
    $brewMethods = $locations[0]['methodsAvailable'];
    // 保存与此咖啡店关联的所有冲泡方法(保存关联关系)
    $parentCafe->brewMethods()->sync($brewMethods);

    // 将当前咖啡店数据推送到已添加咖啡店数组
    array_push($addedCafes, $parentCafe->toArray());

    // 第一个索引的位置信息已经使用,从第 2 个位置开始
    if (count($locations) > 1) {
        // 从索引值 1 开始,以为第一个位置已经使用了
        for ($i = 1; $i < count($locations); $i++) {
            // 其它分店信息的获取和保存,与总店共用名称、网址、描述、烘焙师等信息,其他逻辑与总店一致
            $cafe = new Cafe();

            $cafe->parent = $parentCafe->id;
            $cafe->name = $request->input('name');
            $cafe->location_name = $locations[$i]['name'] ?: '';
            $cafe->address = $locations[$i]['address'];
            $cafe->city = $locations[$i]['city'];
            $cafe->state = $locations[$i]['state'];
            $cafe->zip = $locations[$i]['zip'];
            $coordinates = GaodeMaps::geocodeAddress($cafe->address, $cafe->city, $cafe->state);
            $cafe->latitude = $coordinates['lat'];
            $cafe->longitude = $coordinates['lng'];
            $cafe->roaster = $request->input('roaster') != '' ? 1 : 0;
            $cafe->website = $request->input('website');
            $cafe->description = $request->input('description') ?: '';
            $cafe->added_by = $request->user()->id;
            $cafe->save();

            $cafe->brewMethods()->sync($locations[$i]['methodsAvailable']);

            array_push($addedCafes, $cafe->toArray());
        }
    }

    return response()->json($addedCafes, 201);
}
在这段代码中我们将 locations 中的第一个位置信息作为总店位置,其他位置信息作为分店位置(如果 locations 数组长度为 1,则表示没有分店),分店与总店通过 parent 字段进行关联,并且与总店共享 name、website、description、roaster、added_by 信息,但是位置信息、地理编码、冲泡方法等字段各自独立,冲泡方法通过 sync 方法以关联关系方式存储,映射关系存放在 cafes_brew_methods 中间表。最后,我们会将所有添加的咖啡店记录推送到 $addedCafes 数组并返回。
第十步:定义咖啡店模型的父子关联
由于我们在上一步中为咖啡店模型类新增了一些字段,并且将分店与总店映射成了父子关联关系,父子模型之间通过 parent 字段进行关联,因此需要对 Cafe 模型对应数据表 cafes 的结构进行修改。首先创建一个数据库迁移文件:
php artisan make:migration added_cafe_parent_child_relationship然后编写新生成的迁移文件代码如下:
<?php

use Illuminate\Support\Facades\Schema;
use Illuminate\Database\Schema\Blueprint;
use Illuminate\Database\Migrations\Migration;

class AddedCafeParentChildRelationship extends Migration
{
    /**
     * Run the migrations.
     *
     * @return void
     */
    public function up()
    {
        Schema::table('cafes', function( Blueprint $table ){
            $table->integer('parent')->unsigned()->nullable()->after('id');
            $table->string('location_name')->after('name');
            $table->integer('roaster')->after('longitude');
            $table->text('website')->after('roaster');
            $table->text('description')->after('website');
            $table->integer('added_by')->after('description')->unsigned()->nullable();
        });
    }

    /**
     * Reverse the migrations.
     *
     * @return void
     */
    public function down()
    {
        Schema::table('cafes', function( Blueprint $table ){
            $table->dropColumn('parent');
            $table->dropColumn('location_name');
            $table->dropColumn('roaster');
            $table->dropColumn('website');
            $table->dropColumn('description');
            $table->dropColumn('added_by');
        });
    }
}
运行数据库迁移命令让修改生效:
php artisan migrate然后在模型类 Cafe 中定义父子关联关系(自身模型的一对多关联):
// 关联分店
public function children()
{
    return $this->hasMany(Cafe::class, 'parent', 'id');
}

// 归属总店
public function parent()
{
    return $this->hasOne(Cafe::class, 'id', 'parent');
}
这样我们就可以通过上述方法查询某个咖啡店的所有分店/归属总店信息了。
第十一步:添加 UX 特性到表单
UX 是 User Experience 的简写,表示用户体验,我们最后在动态添加位置信息表单组件添加一些增强用户体验的功能。比如,在表单提交成功后清除表单并显示通知。为此,首先需要在 NewCafe.vue 组件的计算属性中添加 getCafeAddStatus 方法,这样,就可以监听状态变化:
computed: {
    brewMethods() {
        return this.$store.getters.getBrewMethods;
    },
    addCafeStatus() {
        return this.$store.getters.getCafeAddStatus;
    }
},
然后为 addCafeStatus 属性添加如下监听方法:
watch: {
    'addCafeStatus': function () {
        if (this.addCafeStatus === 2) {
            // 添加成功
            this.clearForm();
            $("#cafe-added-successfully").show().delay(5000).fadeOut();
        }

        if (this.addCafeStatus === 3) {
            // 添加失败
            $("#cafe-added-unsuccessfully").show().delay(5000).fadeOut();
        }
    }
},
最后,我们在 methods 对象中定义上述代码中的 clearForm 方法重置表单数据:
clearForm() {
     this.name = '';
     this.locations = [];
     this.website = '';
     this.description = '';
     this.roaster = false;
     this.validations = {
         name: {
             is_valid: true,
             text: ''
         },
         locations: [],
         oneLocation: {
             is_valid: true,
             text: ''
         },
         website: {
             is_valid: true,
             text: ''
         }
     };

     this.addLocation();
}
清理完表单数据信息后,会调用 this.addLocation() 添加一个新的位置信息到表单。
第十二步:通过动态表单提交咖啡店
至此,我们已经完成基于动态表单添加多个咖啡店位置信息的代码编写,运行 npm run dev 重新构建前端资源,然后在浏览器中访问 http://roast.test/#/cafes/new,即可看到新的表单提交页面:

点击「新增位置」即可新增位置区块,点击「移除位置」即可移除与之关联的位置区块,在开始提交咖啡店数据之前,先清空数据表 cafes 中的现有数据,然后填写表单后点击「提交表单」提交数据,添加成功后即可在数据库中看到保存的咖啡店数据了:

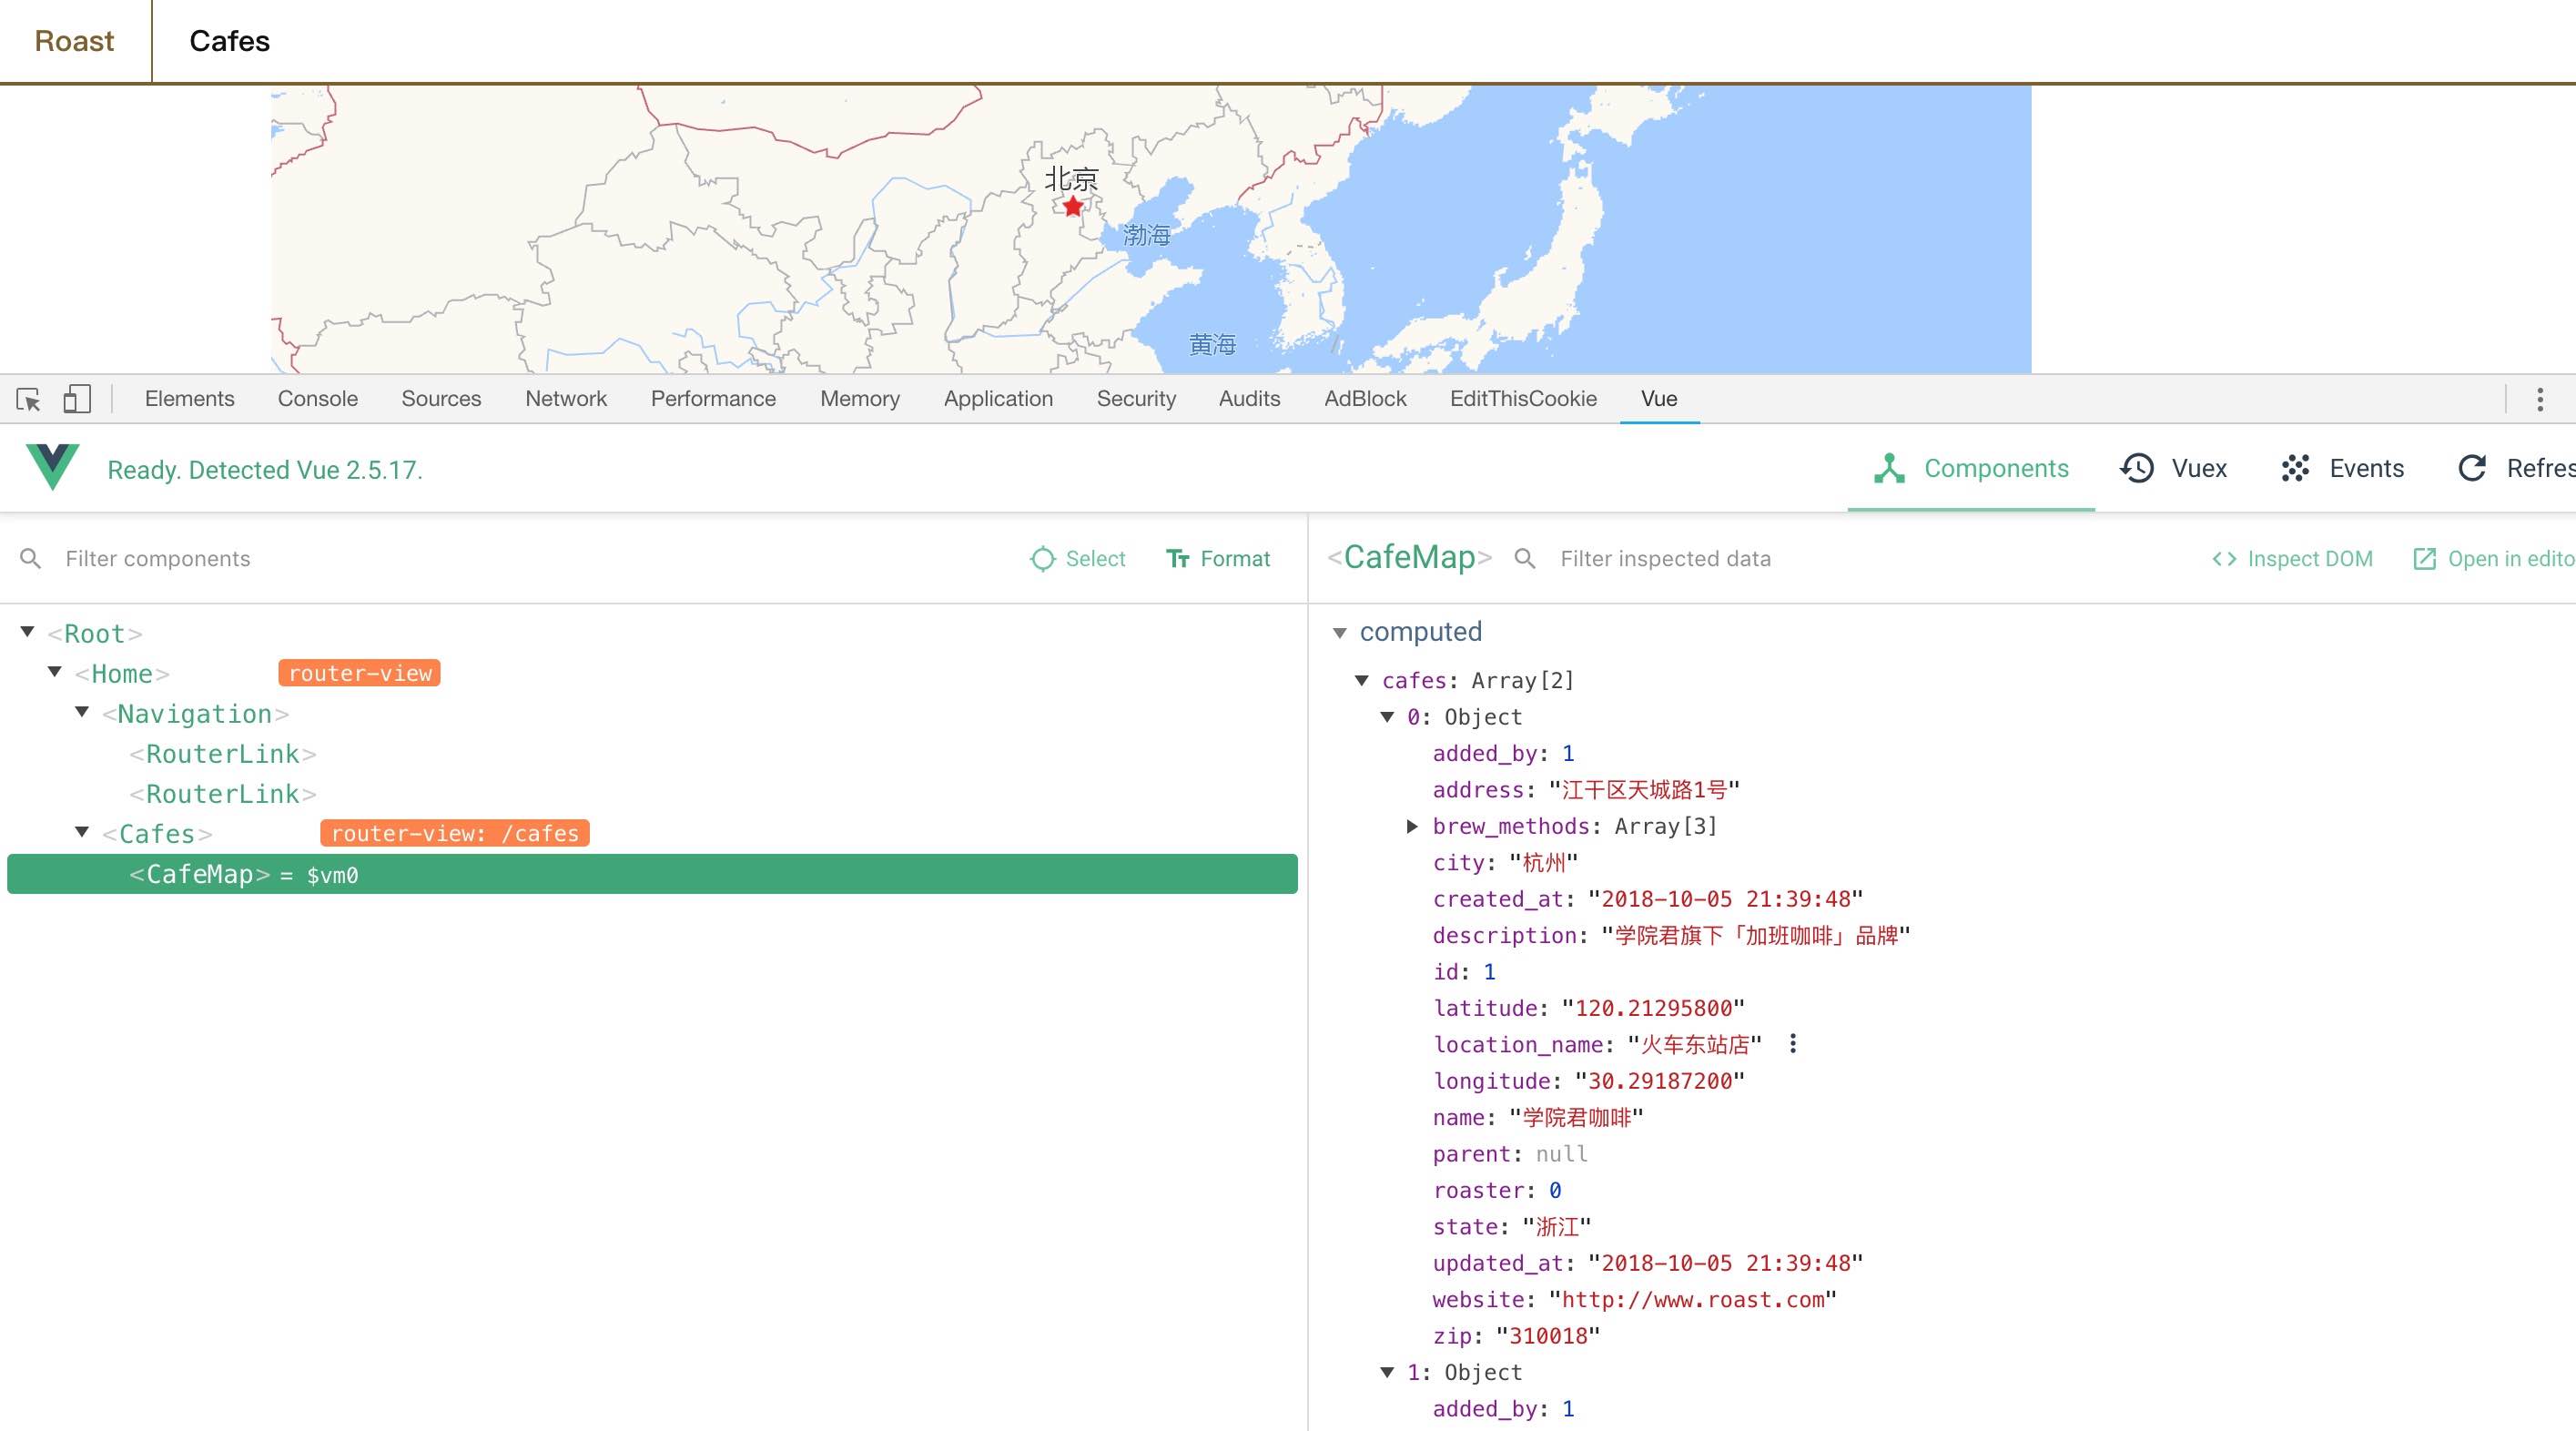
访问 http://roast.test/#/cafes,也可以在浏览器开发者工具的 Vue Tab 中看到所有咖啡店数据:

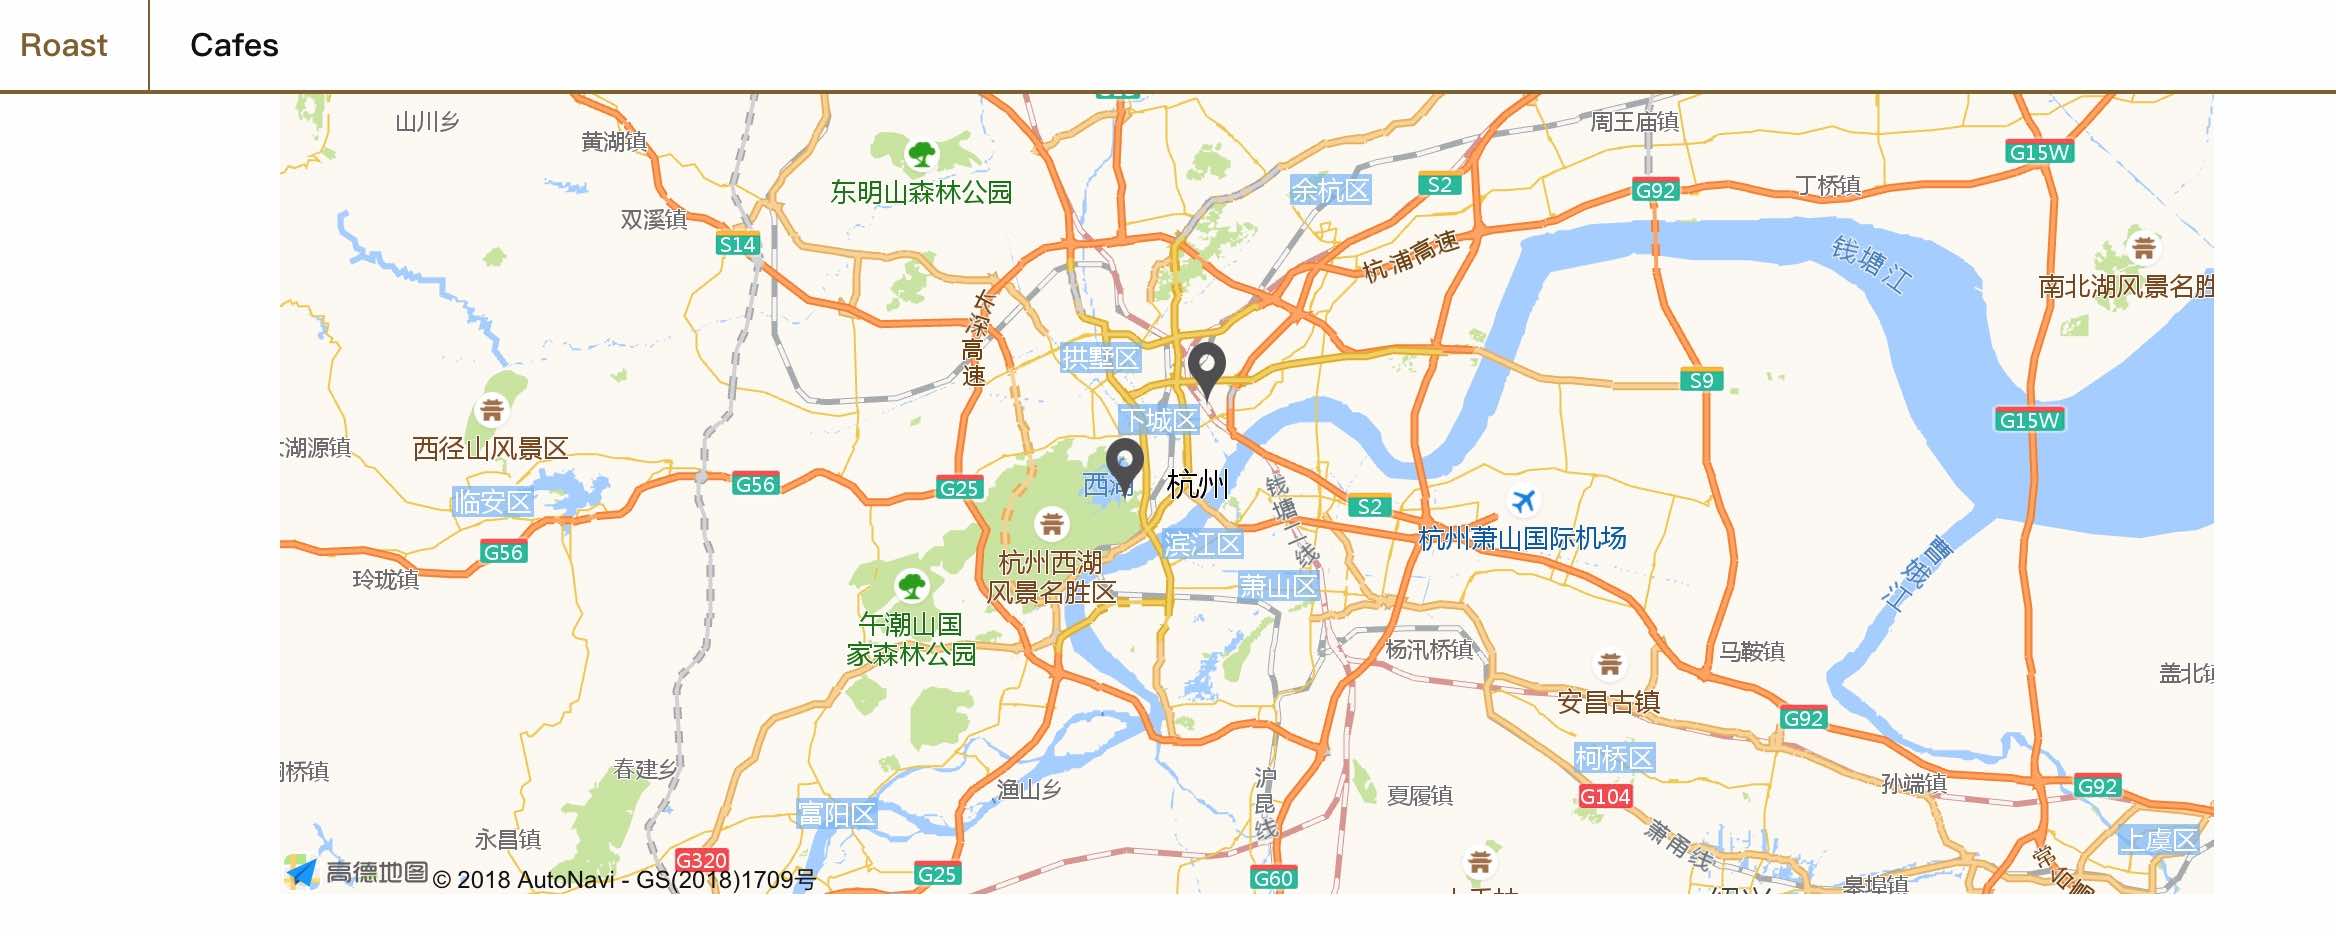
并且在地图上也可以看到相应的点标记:

注:本项目源码位于 nonfu/roastapp。

16 Comments
前端数据传不到后端去了。。。
request->user()->id; user对象为null,不知道为啥
website验证方式不对 , name 没有验证 url laravel url验证好像是 有 https://的
用 Auth::user()
应该是还没登录
StoreCafeRequest验证请求,会返回422错误。