Blade 模板引擎
简介
Blade 是由 Laravel 提供的非常简单但功能强大的模板引擎,不同于其他流行的 PHP 模板引擎,Blade 在视图中并不约束你使用 PHP 原生代码。所有的 Blade 视图最终都会被编译成原生 PHP 代码并缓存起来直到被修改,这意味着对应用的性能而言 Blade 基本上是零开销。Blade 视图文件使用 .blade.php 文件扩展并存放在 resources/views 目录下。
模板继承
定义布局
使用 Blade 的两个最大优点是模板继承和片段组合,开始之前让我们先看一个例子。首先,我们测试“主”页面布局,由于大多数 Web 应用在不同页面中使用同一个布局,可以很方便的将这个布局定义为一个单独的 Blade 页面:
<!-- 存放在 resources/views/layouts/app.blade.php -->

<html>
    <head>
        <title>应用名称 - @yield('title')</title>
    </head>
    <body>
        @section('sidebar')
            这里是侧边栏
        @show

        <div class="container">
            @yield('content')
        </div>
    </body>
</html>
正如你所看到的,该文件包含典型的 HTML 标记,不过,注意 @section 和 @yield 指令,前者正如其名字所暗示的,定义了一个内容片段,而后者用于显示给定片段的内容。
现在我们已经为应用定义了一个布局,接下来让我们定义继承该布局的子页面吧。
继承布局
定义子页面的时候,可以使用 Blade 的 @extends 指令来指定子页面所继承的布局,继承一个 Blade 布局的视图可以使用 @section 指令注入内容到布局定义的内容片段中,记住,如上面例子所示,这些片段的内容将会显示在布局中使用 @yield 的地方:
<!-- 存放在 resources/views/child.blade.php -->

@extends('layouts.app')

@section('title', 'Laravel学院')

@section('sidebar')
    @parent
    <p>Laravel 学院致力于提供优质 Laravel 中文学习资源</p>
@endsection

@section('content')
    <p>这里是主体内容,完善中...</p>
@endsection
在本例中,sidebar 片段使用 @parent 指令来追加(而非覆盖)内容到继承布局的侧边栏,@parent 指令在视图渲染时将会被布局中的内容替换。
注:与之前的示例相反,
sidebar部分以@endsection结束而不是@show,@endsection指令只是定义一个 section 而@show指令定义并立即返回这个 section。
@yield 指令还接受一个默认值作为第二个参数,这个值会在被 yield 的 section 未定义时被渲染:
@yield('content', View::make('view.name'))
Blade 视图可以通过 view 方法直接从路由中返回:
Route::get('blade', function () {
   return view('child');
});
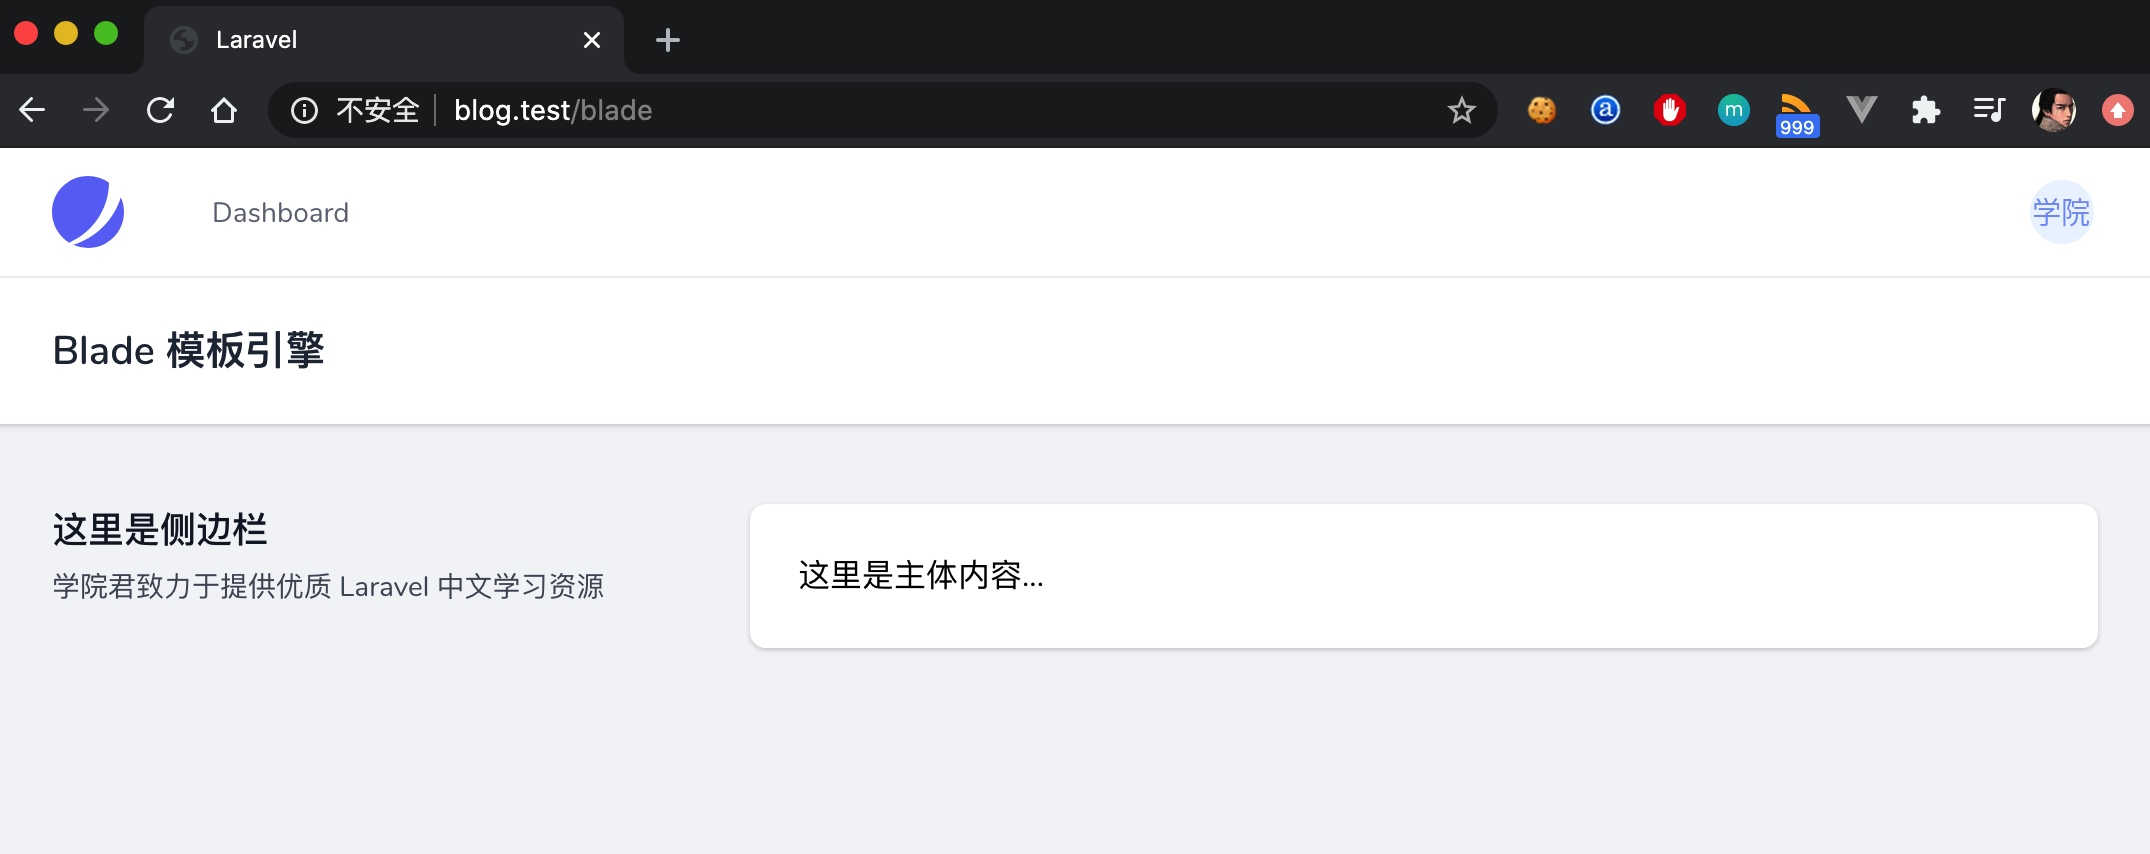
这样在浏览器中访问 http://blog.test/blade,就可以看到页面显示如下:

基于 Jetstream 优化页面渲染效果
现在页面还很粗糙,我们可以基于 Jetstream 内置的组件对其进行优化,将 child.blade.php 模板代码调整如下:
<x-app-layout>
    <x-slot name="header">
        <h2 class="font-semibold text-xl text-gray-800 leading-tight">
            Blade 模板引擎
        </h2>
    </x-slot>

    <div>
        <div class="max-w-7xl mx-auto py-10 sm:px-6 lg:px-8">
            <x-jet-action-section>
                <x-slot name="title">这里是侧边栏</x-slot>
                <x-slot name="description">学院君致力于提供优质 Laravel 中文学习资源</x-slot>
                <x-slot name="content">这里是主体内容...</x-slot>
            </x-jet-action-section>
        </div>
    </div>
</x-app-layout>
这里 child 视图继承了 Jetstream 提供的 lauyouts/app.blade.php 布局,渲染后的页面效果如下:

是不是好看多了。
数据显示
可以通过两个花括号包裹变量来显示传递到视图的数据,比如,如果给出如下路由:
Route::get('greeting', function () {
    return view('welcome', ['name' => '学院君']);
});
那么可以通过如下方式显示 name 变量的内容:
你好, {{ $name }}。
注:Blade 的
{{}}语句已经经过 PHP 的htmlentities函数处理以避免 XSS 攻击。
当然,不限制显示到视图中的变量内容,你还可以输出任何 PHP 函数的结果,实际上,可以将任何 PHP 代码放到 Blade 模板语句中:
The current UNIX timestamp is {{ time() }}.
显示原生数据
默认情况下,Blade 的 {{ }} 语句已经通过 PHP 的 htmlentities 函数处理以避免 XSS 攻击,如果你不想要数据被处理,比如要输出带 HTML 元素的富文本,可以使用如下语法:
Hello, {!! $name !!}.
注:输出用户提供的内容时要当心,对用户提供的内容总是要使用双花括号包裹以避免 XSS 攻击。
渲染 JSON 内容
有时候你可能会将数据以数组方式传递到视图再将其转化为 JSON 格式以便初始化某个 JavaScript 变量,例如:
<script>
    var app = <?php echo json_encode($array); ?>;
</script>
这样显得很麻烦,有更简便的方式来实现这个功能,那就是 Blade 的 @json 指令,@json 指令接收和 json_encode 函数一样的参数:
<script>
    var app = @json($array);

    var app = @json($array, JSON_PRETTY_PRINT);
</script>
注:你只能使用
@json指令渲染已存在的变量。Blade 模板基于正则表达式,试图传入复杂的表达式到该指令可能会导致未知错误。
HTML 实体编码
默认情况下,Blade(以及辅助函数 e)会对 HTML 实体进行双重编码。如果你想要禁止双重编码,可以在 AppServiceProvider 的 boot 方法中调用 Blade::withoutDoubleEncoding 方法:
<?php

namespace App\Providers;

use Illuminate\Support\Facades\Blade;
use Illuminate\Support\ServiceProvider;

class AppServiceProvider extends ServiceProvider
{
    /**
     * Bootstrap any application services.
     *
     * @return void
     */
    public function boot()
    {
        Blade::withoutDoubleEncoding();
    }
}
Blade & JavaScript 框架
由于很多 JavaScript 框架也是用花括号来表示要显示在浏览器中的表达式,如 Vue,我们可以使用 @ 符号来告诉 Blade 渲染引擎该表达式应该保持原生格式不作改动。比如:
<h1>Laravel</h1>
Hello, @{{ name }}.
在本例中,@ 符号在编译阶段会被 Blade 移除,但是,{{ name }} 表达式将会保持不变,从而可以被 JavaScript 框架正常渲染。
@ 符号还可以用于取消 Blade 指令:
{{-- Blade --}}
@@json()

<!-- HTML output -->
@json()
@verbatim指令
如果你在模板中有很大一部分篇幅显示 JavaScript 变量,那么可以将这部分 HTML 封装在 @verbatim 指令中,这样就不需要在每个 Blade 输出表达式前加上 @ 前缀:
@verbatim
    <div class="container">
        Hello, {{ name }}.
    </div>
@endverbatim
流程控制
除了模板继承和数据显示之外,Blade 还为常用的 PHP 流程控制提供了便利操作,例如条件语句和循环,这些快捷操作提供了一个干净、简单的方式来处理 PHP 的流程控制,同时保持和 PHP 相应语句的相似性。
If 语句
可以使用 @if , @elseif , @else 和 @endif 来构造 if 语句,这些指令的功能和 PHP 相同:
@if (count($records) === 1)
    I have one record!
@elseif (count($records) > 1)
    I have multiple records!
@else
    I don't have any records!
@endif
为方便起见,Blade 还提供了 @unless 指令,表示除非:
@unless (Auth::check())
    You are not signed in.
@endunless
此外,Blade 还提供了 @isset 和 @empty 指令,分别对应 PHP 的 isset 和 empty 方法:
@isset($records)
    // $records is defined and is not null...
@endisset

@empty($records)
    // $records is "empty"...
@endempty
认证指令
@auth 和 @guest 指令可用于快速判断当前用户是否登录:
@auth
    // 用户已登录...
@endauth

@guest
    // 用户未登录...
@endguest
如果需要的话,你也可以在使用 @auth 和 @guest 的时候指定认证守卫:
@auth('admin')
    // The user is authenticated...
@endauth

@guest('admin')
    // The user is not authenticated...
@endguest
Section 指令
你可以使用 @hasSection 指令判断某个 section 中是否有内容:
@hasSection('navigation')
    <div class="pull-right">
        @yield('navigation')
    </div>

    <div class="clearfix"></div>
@endif
相对的,sectionMissing 可用于判断某个 section 是否不包含内容:
@sectionMissing('navigation')
    <div class="pull-right">
        @include('default-navigation')
    </div>
@endif
环境指令
你可以使用 @production 指令检查应用是否在生产环境运行:
@production
    // Production specific content...
@endproduction
或者,你可以使用 @env 指令判断应用是否在指定环境运行:
@env('staging')
    // The application is running in "staging"...
@endenv

@env(['staging', 'production'])
    // The application is running in "staging" or "production"...
@endenv
Switch 语句
switch 语句可以通过 @switch,@case,@break,@default 和 @enswitch 指令构建:
@switch($i)
    @case(1)
        First case...
        @break

    @case(2)
        Second case...
        @break

    @default
        Default case...
@endswitch
循环
除了条件语句,Blade 还提供了简单的指令用于处理 PHP 的循环结构,同样,这些指令的功能和 PHP 对应功能完全一样:
@for ($i = 0; $i < 10; $i++)
    The current value is {{ $i }}
@endfor

@foreach ($users as $user)
    <p>This is user {{ $user->id }}</p>
@endforeach

@forelse ($users as $user)
    <li>{{ $user->name }}</li>
@empty
    <p>No users</p>
@endforelse

@while (true)
    <p>I'm looping forever.</p>
@endwhile
注:在循环的时候可以使用
$loop变量获取循环信息,例如是否是循环的第一个或最后一个迭代。
使用循环的时候还可以结束循环或跳出当前迭代:
@foreach ($users as $user)
    @if ($user->type == 1)
        @continue
    @endif

    <li>{{ $user->name }}</li>

    @if ($user->number == 5)
        @break
    @endif
@endforeach
还可以使用指令声明来引入条件:
@foreach ($users as $user)
    @continue($user->type == 1)
        <li>{{ $user->name }}</li>
    @break($user->number == 5)
@endforeach
$loop 变量
在循环的时候,可以在循环体中使用 $loop 变量,该变量提供了一些有用的信息,比如当前循环索引,以及当前循环是不是第一个或最后一个迭代:
@foreach ($users as $user)
    @if ($loop->first)
        This is the first iteration.
    @endif

    @if ($loop->last)
        This is the last iteration.
    @endif

    <p>This is user {{ $user->id }}</p>
@endforeach
如果你身处嵌套循环,可以通过 $loop 变量的 parent 属性访问父级循环:
@foreach ($users as $user)
    @foreach ($user->posts as $post)
        @if ($loop->parent->first)
            This is first iteration of the parent loop.
        @endif
    @endforeach
@endforeach
$loop 变量还提供了其他一些有用的属性:
| 属性 | 描述 |
|---|---|
$loop->index |
当前循环迭代索引 (从0开始) |
$loop->iteration |
当前循环迭代 (从1开始) |
$loop->remaining |
当前循环剩余的迭代 |
$loop->count |
迭代数组元素的总数量 |
$loop->first |
是否是当前循环的第一个迭代 |
$loop->last |
是否是当前循环的最后一个迭代 |
$loop->even |
是否是当前循环的偶数迭代 |
$loop->odd |
是否是当前循环的奇数迭代 |
$loop->depth |
当前循环的嵌套层级 |
$loop->parent |
嵌套循环中的父级循环变量 |
注释
Blade 还允许你在视图中定义注释,然而,不同于 HTML 注释,Blade 注释并不会包含到 HTML 中被返回:
{{-- This comment will not be present in the rendered HTML --}}
PHP
在一些场景中,嵌入 PHP 代码到视图中很有用,你可以使用 @php 指令在模板中执行一段原生 PHP 代码:
@php
    //
@endphp
注:尽管 Blade 提供了这个特性,如果过于频繁地使用它意味着你在视图模板中嵌入了过多的业务逻辑,需要注意。
@once 指令
@once 指令允许你定义模板的一部分每次渲染周期只执行一次,这在使用 堆栈 功能推送给定 JavaScript 片段代码到页面头部时很有用。例如,如果要在一个循环中渲染一个组件,你可能希望只在组件首次渲染时推送 JavaScript 代码到 HTML 的 header 中:
@once
    @push('scripts')
        <script>
            // Your custom JavaScript...
        </script>
    @endpush
@endonce
表单
CSRF 字段
任何时候你想要在应用中定义 HTML 表单,都需要在表单中引入隐藏的 CSRF 令牌字段,以便 CSRF 保护中间件可以通过请求验证。你可以使用 Blade 指令 @csrf 来生成令牌字段:
<form method="POST" action="/profile">
    @csrf

    ...
</form>
方法字段
由于 HTML 表单不能发起 PUT、PATCH 以及 DELETE 请求,你需要添加隐藏的 _method 字段来伪造这些 HTTP 请求。Blade 指令 @method 可用于创建这个字段:
<form action="/foo/bar" method="POST">
    @method('PUT')

    ...
</form>
验证错误
@error 指令可用于快速检查给定属性是否存在验证错误消息,在 @error 指令中,你可以打印 $message 变量来显示错误消息:
<!-- /resources/views/post/create.blade.php -->

<label for="title">Post Title</label>

<input id="title" type="text" class="@error('title') is-invalid @enderror">

@error('title')
    <div class="alert alert-danger">{{ $message }}</div>
@enderror
在包含多个表单的页面中,你可以传递指定错误包的名称作为 @error 指令的第二个参数来获取错误消息:
<!-- /resources/views/auth.blade.php -->

<label for="email">Email address</label>

<input id="email" type="email" class="@error('email', 'login') is-invalid @enderror">

@error('email', 'login')
    <div class="alert alert-danger">{{ $message }}</div>
@enderror
组件
组件和插槽给内容片段(section)和布局(layout)带来了方便,不过,有些人可能会发现组件和插槽的模型更容易理解。有两种方法来编写组件:基于类的组件和匿名组件。
要创建基于类的组件,需要使用 Artisan 命令 make:component,下面我们来创建一个简单的 Alert 组件来演示如何使用组件:
php artisan make:component Alert
上述命令会在 App\View\Components 目录下存放新建的 Alert 组件类:
<?php

namespace App\View\Components;

use Illuminate\View\Component;

class Alert extends Component
{
    /**
     * Create a new component instance.
     *
     * @return void
     */
    public function __construct()
    {
        //
    }

    /**
     * Get the view / contents that represent the component.
     *
     * @return \Illuminate\View\View|string
     */
    public function render()
    {
        return view('components.alert');
    }
}
此外,该命令还会为组件创建视图模板,对应视图模板位于 resources/views/components 目录下:
<!-- 存放在 resources/views/components/alert.blade.php -->

<div>
    <!-- An unexamined life is not worth living. - Socrates -->
</div>
手动注册扩展包组件
为自己应用编写组件时,系统会通过遍历 app/View/Components 和 resources/views/components 目录来自动发现组件。
不过,如果你正在构建一个使用 Blade 组件的扩展包,则需要手动注册组件类及其 HTML 标签别名。通常我们在扩展包服务提供者的 boot 方法中注册组件:
use Illuminate\Support\Facades\Blade;

/**
 * Bootstrap your package's services.
 */
public function boot()
{
    Blade::component('package-alert', AlertComponent::class);
}
注册好了之后,就可以在视图模版中通过如下标签别名来使用 Alert 组件:
<x-package-alert/>
显示组件
要显示组件,需要在某个 Blade 模板中使用 Blade 组件标签,组件标签以 x- 开头,后面跟着「烤肉串风格」的组件类名:
<x-alert/>

<x-user-profile/>
如果组件类嵌套在 App\View\Components 目录下的更深层级,可以使用 . 进行分隔,例如,假设组件位于 App\View\Components\Inputs\Button.php,则可以这样进行渲染:
<x-inputs.button/>
传递数据到组件
你可以通过 HTML 属性从组件类传递数据到 Blade 组件模板,要传递原始值使用基本的 HTML 属性即可,要传递 PHP 表达式和变量,需要使用 : 作为属性名前缀:
<!-- 引用 Alert 组件的位置,比如 resources/views/welcome.blade.php -->
<x-alert type="error" :message="$message"/>
然后需要在组件类构造函数中定义组件的必要数据,公开属性可以自动在对应组件视图中生效,而不需要从组件类通过 render 方法传递到视图:
<?php

namespace App\View\Components;

use Illuminate\View\Component;

class Alert extends Component
{
    /**
     * The alert type.
     *
     * @var string
     */
    public $type;

    /**
     * The alert message.
     *
     * @var string
     */
    public $message;

    /**
     * Create the component instance.
     *
     * @param  string  $type
     * @param  string  $message
     * @return void
     */
    public function __construct($type, $message)
    {
        $this->type = $type;
        $this->message = $message;
    }

    /**
     * Get the view / contents that represent the component.
     *
     * @return \Illuminate\View\View|string
     */
    public function render()
    {
        return view('components.alert');
    }
}
然后在渲染组的视图模板中,你可以通过输出变量名显示组件公开属性的内容:
<!-- resources/views/components/alert.blade.php -->

<div class="alert alert-{{ $type }}">
    {{ $message }}
</div>
命名风格
组件类构造函数参数需要使用小驼峰命名风格(camelCase),而在 HTML 属性中引用该参数时则需要使用短划线命名风格(kebab-case)。示例如下:
/**
 * Create the component instance.
 *
 * @param  string  $alertType
 * @param  string  $message
 * @return void
 */
public function __construct($alertType)
{
    $this->alertType = $alertType;
}
$alertType 参数在 HTML 属性中引用方式如下:
<!-- 引用 Alert 组件的位置,比如 resources/views/welcome.blade.php -->
<x-alert alert-type="danger" />
组件方法
除了公开属性可以直接在组件模板中生效之外,任何组件类中的公开方法也可以直接在组件模板中执行,例如,假设有一个包含 isSelected 方法的组件:
/**
 * Determine if the given option is the current selected option.
 *
 * @param  string  $option
 * @return bool
 */
public function isSelected($option)
{
    return $option === $this->selected;
}
你可以在组件模板中通过调用与方法名匹配的变量来执行这个方法:
<!-- 定义组件模板的位置,resources/views/components/alert.blade.php -->

<option {{ $isSelected($value) ? 'selected="selected"' : '' }} value="{{ $value }}">
    {{ $label }}
</option>
使用类里面的属性 & 插槽
Blade 组件还允许你访问组件名、属性以及类渲染方法中的插槽。不过,为了访问这些数据,你需要从组件 render 方法中返回一个闭包,该闭包接收 $data 数组作为唯一参数:
/**
 * Get the view / contents that represent the component.
 *
 * @return \Illuminate\View\View|\Closure|string
 */
public function render()
{
    return function (array $data) {
        // $data['componentName'];
        // $data['attributes'];
        // $data['slot'];

        return '<div>Component content</div>';
    };
}
componentName 等于 HTML 标签 x- 前缀之后的组件名,因此 <x-alert/> 对应的 componentName 值是 alert。attributes 元素会包含所有在组件 HTML 标签中出现的属性。slot 元素是一个 Illuminate\Support\HtmlString 实例,其中包含了来自组件的插槽内容。
额外依赖
如果组件需要使用 Laravel 服务容器中的依赖,可以在组件类构造函数参数列表中将它们罗列在所有组件数据属性之前,这样一来,它们就可以通过容器自动注入:
use App\AlertCreator

/**
 * Create the component instance.
 *
 * @param  \App\AlertCreator  $creator
 * @param  string  $type
 * @param  string  $message
 * @return void
 */
public function __construct(AlertCreator $creator, $type, $message)
{
    $this->creator = $creator;
    $this->type = $type;
    $this->message = $message;
}
管理属性
我们已经介绍了如何传递数据属性到组件,不过,有时候,你可能需要指定额外的 HTML 属性,例如 class,这并不是组件正常运行所需数据的一部分。通常,你可能想要将这些额外属性向下传递到组件模板的根元素,例如,假设我们想要这样渲染一个 alert 组件:
<!-- 引用 Alert 组件的位置,比如 resources/views/welcome.blade.php -->
<x-alert type="error" :message="$message" class="mt-4"/>
所有不是组件构造函数一部分的属性将会自动添加到组件的「属性包」里面,这个属性包会通过 $attributes 变量自动在组件模板中生效,所有这些属性都可以在组件模板中通过打印该变量生效:
<!-- 定义组件模板的位置,resources/views/components/alert.blade.php -->
<div {{ $attributes }}>
    <div class="alert alert-{{ $type }}" >
        {{ $message }}
    </div>
</div>
对应的渲染结果如下:

注:目前还不支持在组件上直接使用类似
@env这样的指令。
默认/合并属性
有时候你可能需要指定属性的默认值或者合并额外值到某些组件属性中,这可以通过使用属性包的 merge 方法实现,比如我们将上面例子中的父子元素 class 属性合并:
<!-- resources/views/components/alert.blade.php -->
<div {{ $attributes->merge(['class' => 'alert alert-'.$type]) }}>
    {{ $message }}
</div>
然后我们在引用这个组件的地方调整属性定义如下:
<!-- Alert 组件,resources/views/welcome.blade.php -->
<x-alert type="error" :message="$message" class="mb-4"/>
最后,该组件的渲染结果 HTML 会变成这个样子:

过滤属性
你可以使用 filter 方法对属性进行过滤,该方法接收一个闭包,如果想要保留属性包中的对应属性值,在闭包函数中返回 true 即可:
{{ $attributes->filter(fn ($value, $key) => $key == 'foo') }}
为了方便,你可以使用 whereStartsWith 方法来获取所有键值以指定字符串开头的属性:
{{ $attributes->whereStartsWith('wire:model') }}
使用 first 方法,你可以渲染给定属性包中的第一个属性:
{{ $attributes->whereStartsWith('wire:model')->first() }}
插槽
有时候,你需要通过「插槽」传递额外内容到组件,我们假设创建了这样的一个 Alert2 组件:
php artisan make:component Alert2
修改组件模板代码如下:
<!-- /resources/views/components/alert2.blade.php -->

<div class="alert alert-danger">
    {{ $slot }}
</div>
我们可以通过注入内容到组件标签来传递内容到 slot 插槽:
<!--引用 Alert2 组件,resources/views/welcome.blade.php-->
<x-alert2>
    <strong>Whoops!</strong> Something went wrong!
</x-alert2>
有时候一个组件需要在组件内不同位置渲染不同的插槽。下面我们来编辑 alert2 组件模板以便可以注入「标题」:
<!-- /resources/views/components/alert2.blade.php -->

<span class="alert-title">{{ $title }}</span>

<div class="alert alert-danger">
    {{ $slot }}
</div>
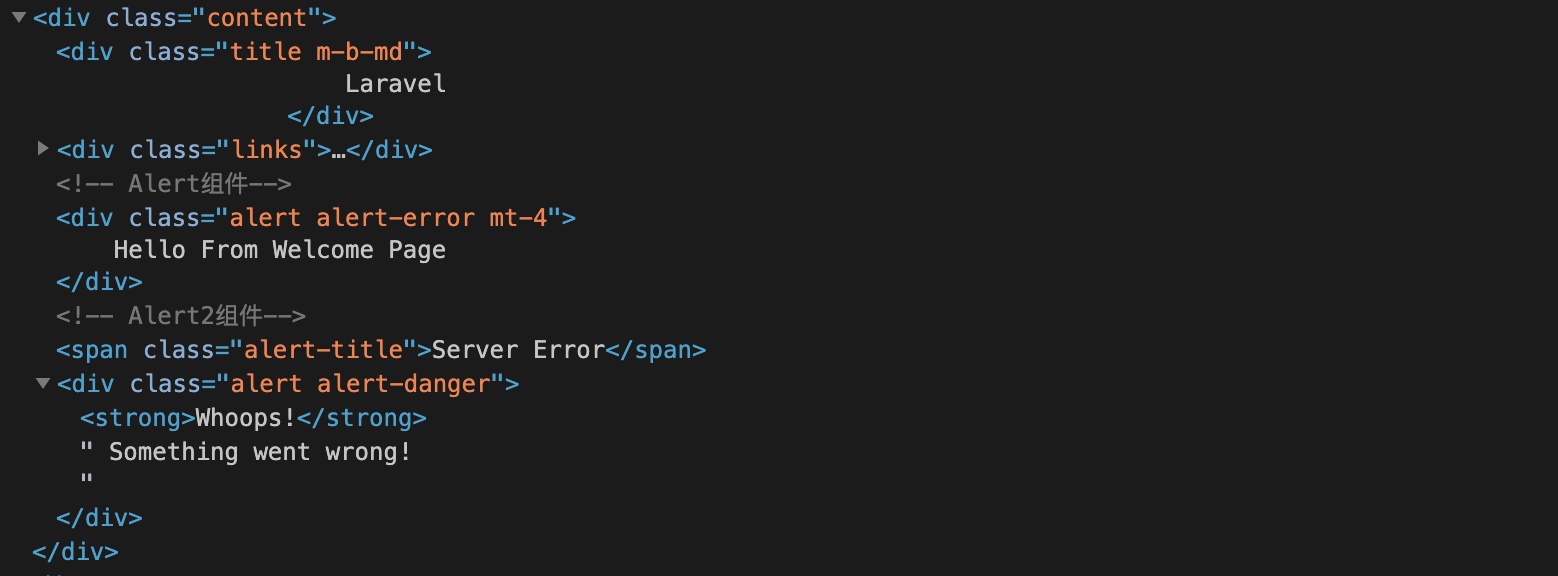
你可以使用 x-slot 标签定义命名插槽的内容(比如,这里定义了一个名称为 title 的命名插槽,对应内容会注入到上面组件模板的 title 插槽中),任何不在 x-slot 标签中的内容都会被传递给组件模板中的 $slot 变量:
<!--引用 Alert2 组件,resources/views/welcome.blade.php-->
<x-alert2>
    <x-slot name="title">
        Server Error
    </x-slot>

    <strong>Whoops!</strong> Something went wrong!
</x-alert2>
上述组件模板渲染结果如下:

插槽作用域
如果你使用过类似 Vue 这样的 JavaScript 框架,你可能会对插槽作用域很熟悉,通过插槽作用域,你可以在组件中访问来自插槽的数据或方法。在 Laravel 中,你也可以在组件类定义公共属性或方法来实现类似的功能,只需要在插槽中通过 $component 变量引用对应的属性或方法即可:
<x-alert>
    <x-slot name="title">
        {{ $component->formatAlert('Server Error') }}
    </x-slot>

    <strong>Whoops!</strong> Something went wrong!
</x-alert>
内联组件视图
对于非常小的组件,管理组件类和组件视图模板有点麻烦,因此,你可以直接从 render 方法中返回组件 HTML 标记:
/**
 * Get the view / contents that represent the component.
 *
 * @return \Illuminate\View\View|string
 */
public function render()
{
    return <<<'blade'
        <div class="alert alert-danger">
            {{ $slot }}
        </div>
    blade;
}
生成内联视图组件
要创建一个渲染内联视图的组件,可以在执行 make:component 命令时带上 inline 选项,这样就不会生成对应的 HTML 组件模板了:
php artisan make:component Alert --inline
匿名组件
和内联组件类似,匿名组件提供了通过单文件来管理组件的机制。不过,匿名组件使用的是单视图文件,并没有与之关联的类。要定义匿名组件,你只需要在 resources/views/components 目录下存放 Blade 模板即可。例如,假设在 resources/views/components/alert3.blade.php 中定义了一个组件模板,则可以通过如下方式在其他视图模板中引用:
<x-alert3/>
同样可以使用 . 符号来标识嵌套组件,只不过此时的嵌套组件是通过视图模板目录层级进行嵌套,例如,假设该组件定义在 resources/views/components/inputs/button.blade.php 中,则可以这样进行渲染:
<x-inputs.button/>
数据属性/HTML 属性
由于匿名组件没有关联类,你可能会好奇如何将不同的数据以变量方式传递到对应的组件以及哪些属性会被存放到组件的属性包。
你可以在组件 Blade 模板的顶部使用 @props 指令来指定哪些属性是数据变量,这样一来,组件上的所有其他属性都会通过组件的属性包生效:
<!-- /resources/views/components/alert3.blade.php -->

@props(['type', 'message'])

<div {{ $attributes->merge(['class' => 'alert alert-'.$type]) }}>
    {{ $message }}
</div>
我们可以在 welcome.blade.php 视图模板中这样引用 alert3 匿名组件:
<!-- Alert3组件(匿名组件)-->
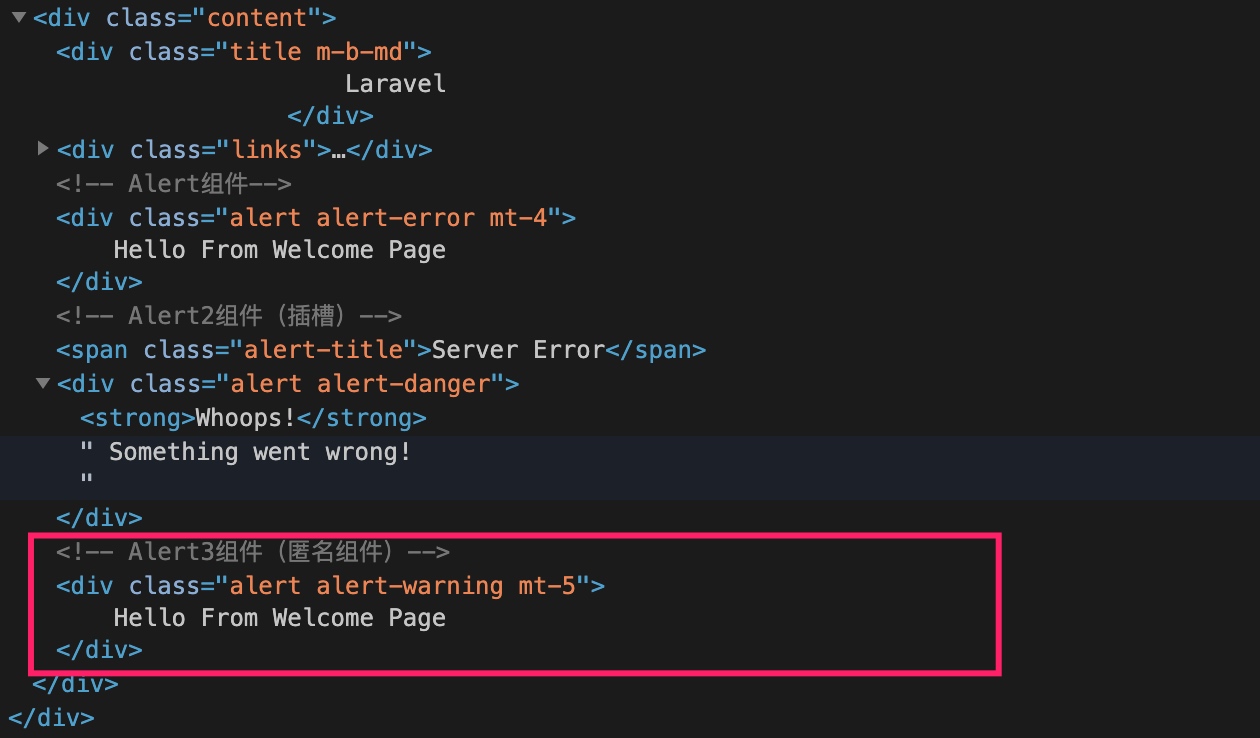
<x-alert3 type="warning" :message="$message" class="mt-5"/>
对应的渲染结果如下:

动态组件
有时候,你可能需要渲染组件但是直到运行时都不知道要渲染哪个组件,在这种场景下,可以使用 Laravel 内置的 dynamic-component 组件基于运行时的值或变量渲染组件:
<x-dynamic-component :component="$componentName" class="mt-4" />
包含子视图
Blade 的 @include 指令允许你很轻松地在一个视图中包含另一个 Blade 视图,所有父级视图中变量在被包含的子视图中依然有效:
<div>
    @include('shared.errors')

    <form>
        <!-- Form Contents -->
    </form>
</div>
上述指令会在当前目录下的 shared 子目录中寻找 errors.blade.php 文件并将其内容引入当前视图。
尽管被包含的视图可以继承所有父视图中的数据,你还可以传递额外参数到被包含的视图:
@include('view.name', ['some' => 'data'])
当然,如果你尝试包含一个不存在的视图,Laravel 会抛出错误,如果你想要包含一个有可能不存在的视图,可以使用 @includeIf 指令:
@includeIf('view.name', ['some' => 'data'])
如果包含的视图取决于一个给定的布尔条件,可以使用 @includeWhen 指令:
@includeWhen($boolean, 'view.name', ['some' => 'data'])
与 @includeWhen 相对的指令是 @includeUnless,它会在给定布尔表达式值为 false 时引入视图:
@includeUnless($boolean, 'view.name', ['some' => 'data'])
要包含给定数组中的第一个视图,可以使用 @includeFirst 指令:
@includeFirst(['custom.admin', 'admin'], ['some' => 'data'])
注:不要在 Blade 视图中使用
__DIR__和__FILE__常量,因为它们会指向缓存视图的路径。
为子视图引入设置别名
如果引入的子视图存放在某个子目录中,你可能希望为它们设置别名以便于访问。例如,假设 Blade 子视图存放在 resources/views/includes/input.blade.php 中,对应内容如下:
<input type="{{ $type ?? 'text' }}">
你可以使用 include 方法来为这个引入设置别名,将 includes.input 设置为 input,通常,该操作在 AppServiceProvider 的 boot 方法中完成:
use Illuminate\Support\Facades\Blade;

Blade::include('includes.input', 'input');
这样一来,就可以将设置的别名作为 Blade 指令用来渲染子视图了:
@input(['type' => 'email'])
在视图中渲染集合数据
你可以使用 Blade 的 @each 指令通过一行代码循环引入多个局部视图:
@each('view.name', $jobs, 'job')
该指令的第一个参数是数组或集合中每个元素要渲染的局部视图,第二个参数是你希望迭代的数组或集合,第三个参数是要分配给当前视图的变量名。举个例子,如果你要迭代一个 jobs 数组,通常你需要在局部视图中访问 $job 变量。在局部视图中可以通过 key 变量访问当前迭代的键。
你还可以传递第四个参数到 @each 指令,该参数用于指定给定数组为空时渲染的视图:
@each('view.name', $jobs, 'job', 'view.empty')
注:通过
@each渲染的视图不会从父视图中继承变量,如果子视图需要这个变量,可以使用@foreach和@include指令来替代。
堆栈
Blade 允许你推送内容到命名堆栈,以便在其他视图或布局中渲染。这在子视图中引入指定 JavaScript 库时很有用:
@push('scripts')
    <script src="/example.js"></script>
@endpush
推送次数不限,要渲染完整的堆栈内容,传递堆栈名称到 @stack 指令即可:
<head>
    <!-- Head Contents -->

    @stack('scripts')
</head>
如果你想要将内容显示在堆栈开头,需要使用 @prepend 指令:
@push('scripts')
    This will be second...
@endpush

// Later...

@prepend('scripts')
    This will be first...
@endprepend
服务注入
@inject 指令可以用于从服务容器中获取服务,传递给 @inject 的第一个参数是服务对应的变量名,第二个参数是要解析的服务类名或接口名:
@inject('metrics', 'App\Services\MetricsService')

<div>
    Monthly Revenue: {{ $metrics->monthlyRevenue() }}.
</div>
扩展 Blade
Blade 甚至还允许你自定义指令,可以使用 directive 方法来注册一个指令。当 Blade 编译器遇到该指令,将会传入参数并调用提供的回调。
下面的例子创建了一个 @datetime($var) 指令格式化给定的 DateTime 的实例 $var:
<?php

namespace App\Providers;

use Illuminate\Support\Facades\Blade;
use Illuminate\Support\ServiceProvider;

class AppServiceProvider extends ServiceProvider
{
    /**
     * Perform post-registration booting of services.
     *
     * @return void
     */
    public function boot()
    {
        \Blade::directive('datetime', function($expression) {
            return "<?php echo ($expression)->format('m/d/Y H:i'); ?>";
        });
    }

    /**
     * 在容器中注册绑定.
     *
     * @return void
     */
    public function register()
    {
        //
    }
}
正如你所看到的,我们可以将 format 方法应用到任何传入指令的表达式上,所以,在本例中,该指令最终生成的 PHP 代码如下:
<?php echo ($var)->format('Y/m/d H:i'); ?>
注:更新完 Blade 指令逻辑后,必须删除所有的 Blade 缓存视图。缓存的 Blade 视图可以通过 Artisan 命令
view:clear移除。
自定义 If 语句
在定义一些简单、自定义的条件语句时,编写自定义指令往往复杂性大于必要性,因为这个原因,Blade 提供了一个 Blade::if 方法通过闭包的方式快速定义自定义的条件指令,例如,我们来自定义一个条件来检查当前应用的云服务提供商,可以在 AppServiceProvider 的 boot 方法中定义这段逻辑:
use Illuminate\Support\Facades\Blade;

/**
 * Perform post-registration booting of services.
 *
 * @return void
 */
public function boot()
{
    Blade::if('cloud', function ($provider) {
        return config('filesystems.default') === $provider;
    });
}
定义好自定义条件后,就可以在模板中使用了:
@cloud('digitalocean')
    // The application is using the digitalocean cloud provider...
@elsecloud('aws')
    // The application is using the aws provider...
@else
    // The application is not using the digitalocean or aws environment...
@endcloud

@unlesscloud('aws')
    // The application is not using the aws environment...
@endcloud

3 Comments
跟着做,到替换 jetstream 那一步会提示 Unable to locate a class or view for component [app-layout].
Jetstream 扩展包安装了吗 是基于 Livewire 技术栈的吗
跳跃性比较大了,再出一个解释文档吧