实现用户个人信息编辑功能
第一步:定义要收集的数据
在这篇教程中,我们将为 Roast 应用添加个人信息编辑页用于完善用户个人信息,以便附近有新咖啡店,或者某个咖啡店新增了用户最喜欢的冲泡方法时通知用户,此外,收集个人信息还可以为用户及朋友推荐附近的咖啡店,从而逐渐形成一个咖啡社区。基于以上种种功能,我们需要收集以下用户信息:
- 最喜欢的咖啡类型
- 口味记录
- 是否公开用户信息
- 位置信息
第二步:完善用户信息表
接下来,我们需要在 users 表中新增以上要收集的字段,首先,创建一个数据库迁移文件:
php artisan make:migration alter_users_add_profile_fields --table=users然后编写在 database/migrations 目录下新生成的迁移文件代码如下:
class AlterUsersAddProfileFields extends Migration
{
    /**
     * Run the migrations.
     *
     * @return void
     */
    public function up()
    {
        Schema::table('users', function (Blueprint $table) {
            $table->text('favorite_coffee')->after('avatar')->comment('最喜欢的咖啡');
            $table->text('flavor_notes')->after('favorite_coffee')->comment('口味记录');
            $table->boolean('profile_visibility')->default('1')->after('flavor_notes')->comment('是否公开个人信息');
            $table->string('city')->after('profile_visibility')->comment('所在城市');
            $table->string('state')->after('city')->comment('所在省份');
        });
    }

    /**
     * Reverse the migrations.
     *
     * @return void
     */
    public function down()
    {
        Schema::table('users', function (Blueprint $table) {
            $table->dropColumn('favorite_coffee');
            $table->dropColumn('flavor_notes');
            $table->dropColumn('profile_visibility');
            $table->dropColumn('city');
            $table->dropColumn('state');
        });
    }
}
我们在 users 表中新增了 5 个字段,运行数据库迁移命令,在数据表中插入这些新的字段:
php artisan migrate在数据库中查看新的 users 表结构如下:

第三步:新增处理用户更新路由
定义好数据表结构后,接下来,我们一步一步来实现用户个人信息编辑功能。首先在路由文件 routes/api.php 中注册一个用于编辑用户个人信息的路由,这个路由需要放到私有路由中,即通过认证才能访问:
/*
|-------------------------------------------------------------------------------
| 更新用户个人信息
|-------------------------------------------------------------------------------
| 请求URL:     /api/v1/user
| 控制器方法:   API\UsersController@putUpdateUser
| 请求方式:     PUT
| 功能描述:     更新认证用户的个人信息
*/
Route::put('/user', 'API\UsersController@putUpdateUser');
然后在控制器 app/Http/Controllers/API/UsersController.php 中为 putUpdateUser 方法定义一个空实现,我们马上就会来实现这个方法:
public function putUpdateUser()
{

}
第四步:更新用户信息请求验证
在实现 putUpdateUser 方法前,我们先为更新用户个人信息请求定义一个表单验证类:
php artisan make:request EditUserRequest编写新生成的表单验证类 app/Http/Requests/EditUserRequest.php 代码如下,我们仅仅为 profile_visibility 定义了验证规则及错误消息提示,其他字段都是文本类型,如果需要的话,你也可以为它们定义验证规则,比如不为空:
<?php

namespace App\Http\Requests;

use Illuminate\Foundation\Http\FormRequest;

class EditUserRequest extends FormRequest
{
    /**
     * Determine if the user is authorized to make this request.
     *
     * @return bool
     */
    public function authorize()
    {
        return true;
    }

    /**
     * Get the validation rules that apply to the request.
     *
     * @return array
     */
    public function rules()
    {
        return [
            'profile_visibility' => 'sometimes|boolean'
        ];
    }

    /**
     * Get the error messages for the defined validation rules.
     *
     * @return array
     */
    public function messages()
    {
        return [
            'profile_visibility.boolean' => 'The profile visibility flag needs to be a boolean'
        ];
    }
}
第五步:实现更新个人信息方法
接下来,就可以实现控制器 API/UsersController.php 中的 putUpdateUser 方法了,我们在这个方法中传入了上面定义的表单验证类 EditUserRequest,这样表单请求数据会自动进行验证,验证通过后才会执行这个控制器方法中的业务逻辑:
public function putUpdateUser(EditUserRequest $request)
{
    $user = Auth::user();

    $favoriteCoffee = $request->input('favorite_coffee');
    $flavorNotes = $request->input('flavor_notes');
    $profileVisibility = $request->input('profile_visibility');
    $city = $request->input('city');
    $state = $request->input('state');

    if ($favoriteCoffee) {
        $user->favorite_coffee = $favoriteCoffee;
    }

    if ($flavorNotes) {
        $user->flavor_notes = $flavorNotes;
    }

    if ($profileVisibility) {
        $user->profile_visibility = $profileVisibility;
    }

    if ($city) {
        $user->city = $city;
    }

    if ($state) {
        $user->state = $state;
    }

    $user->save();

    return response()->json(['user_updated' => true], 201);
}
代码实现很简单,就是从请求实例中获取个人信息字段并将其保存到数据库,然后返回已更新成功的响应给客户端,这样,我们就完成了 Laravel 后端 API 接口的编写,接下来,需要在前端实现表单编辑页以及提交表单数据给这个后端 API 接口。
第六步:前端表单提交功能实现
前端功能实现和我们之前新增咖啡店的实现思路一致:在 Vuex 模块中定义 Action、Mutation 和 Getter,在 Vue Router 中新增一个路由,然后在个人信息编辑页面组件中使用 Vuex 获取数据并提交 Action,最终通过在 Action 中调用的 Axios 发送请求到后端 API 接口实现表单提交。我们按照这个思路的来编写代码。
首先在 resources/assets/js/api/user.js 中定义一个 putUpdateUser 函数通过 Axios 发起 API 请求调用后端个人信息编辑接口,并传递表单数据:
putUpdateUser: function( public_visibility, favorite_coffee, flavor_notes, city, state ){
    return axios.put( ROAST_CONFIG.API_URL + '/user',
        {
            public_visibility: public_visibility,
            favorite_coffee: favorite_coffee,
            flavor_notes: flavor_notes,
            city: city,
            state: state
        }
    );
}
然后在已有的 Vuex 模块 resources/assets/js/modules/users.js 中新增一个状态:
userUpdateStatus: 0定义一个新的 Action editUser 来调用上面实现的 putUpdateUser 函数发起 API 请求,并根据请求结果更新相应的状态值:
editUser({commit, state, dispatch}, data) {
   commit('setUserUpdateStatus', 1);

   UserAPI.putUpdateUser(data.public_visibility, data.favorite_coffee, data.flavor_notes, data.city, data.state)
       .then(function (response) {
           commit('setUserUpdateStatus', 2);
           dispatch('loadUser');
       })
       .catch(function () {
           commit('setUserUpdateStatus', 3);
       });
},
最后,还要在这个 Vuex 模块中定义一个新的 Mutation setUserUpdateStatus 用于全局更新 userUpdateStatus 状态值:
setUserUpdateStatus(state, status) {
    state.userUpdateStatus = status;
}
以及一个新的 Getter getUserUpdateStatus 用于全局获取 userUpdateStatus 状态值:
getUserUpdateStatus( state, status ){
    return state.userUpdateStatus;
}
定义好 Vuex 模块后,我们在 Vue Router 文件 resources/assets/js/routes.js 中新增一个前端路由 profile 用于指向用户个人信息编辑页:
{
    path: 'profile',
    name: 'profile',
    component: Vue.component('Profile', require('./pages/Profile.vue')),
    beforeEnter: requireAuth
}
在这个路由中我们使用了导航守卫从而标识这个路由需要用户登录后才能访问,然后创建路由中使用到的 resources/assets/js/pages/Profile.vue 页面组件,初始化页面组件代码如下:
<style lang="scss">
    @import '~@/abstracts/_variables.scss';

</style>

<template>
    <div id="profile" class="page">

    </div>
</template>

<script>
    export default {

    }
</script>
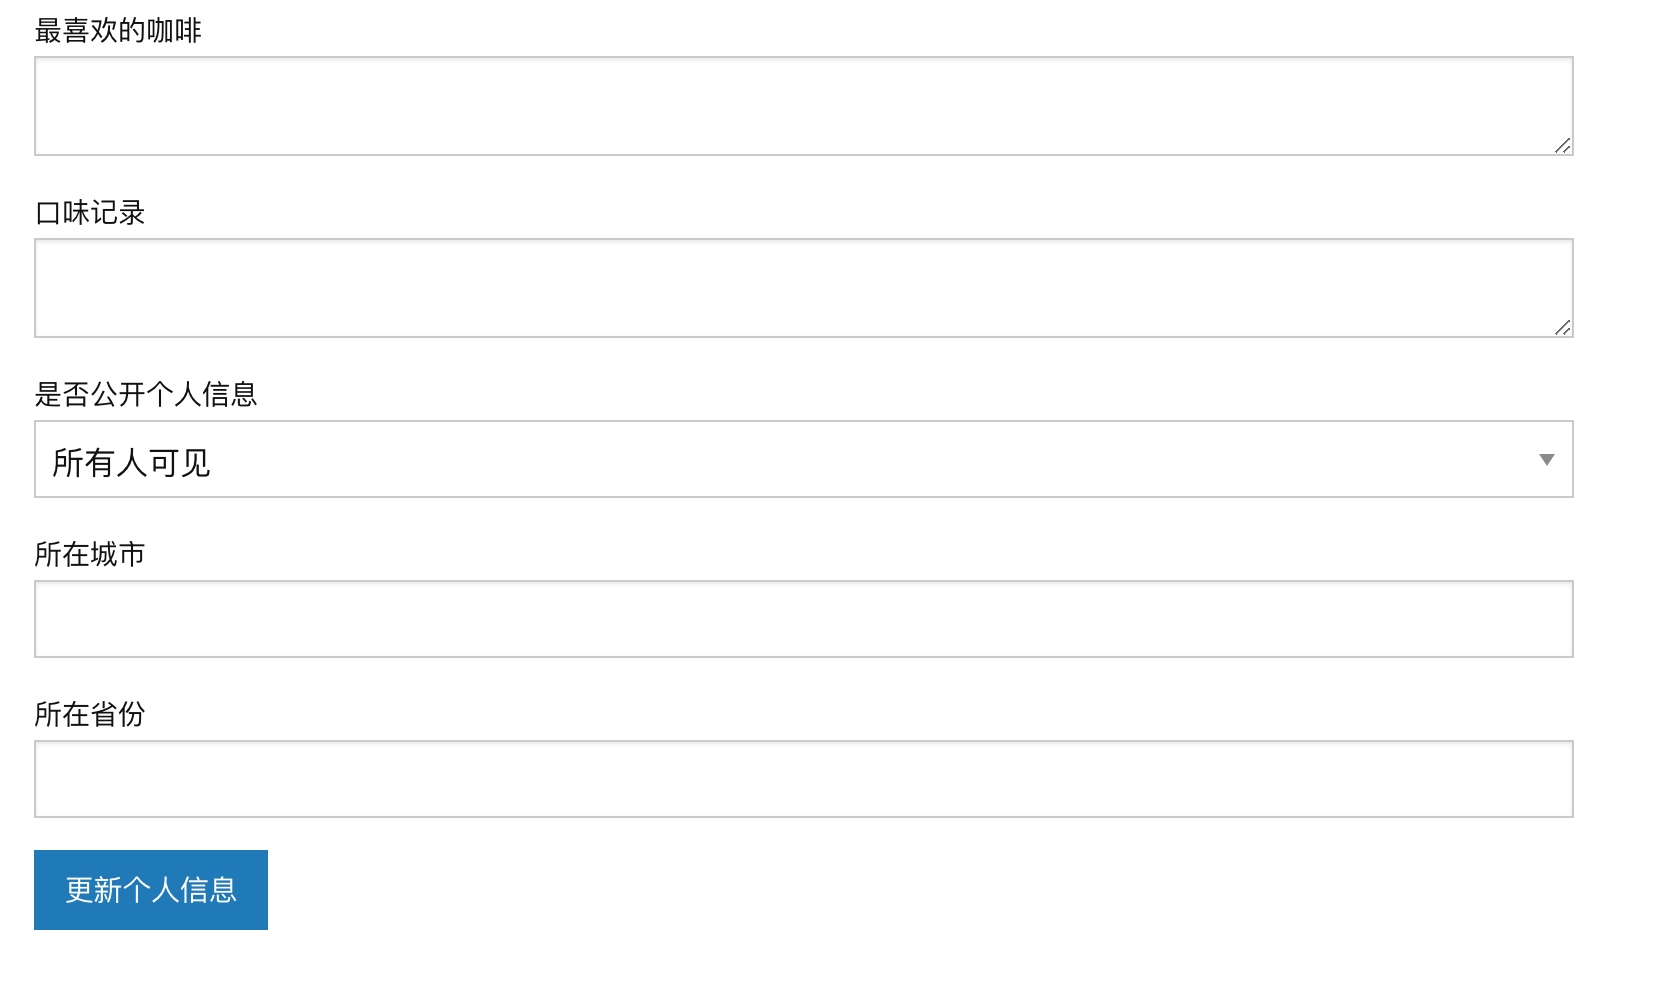
首先为 Profile.vue 编写模板代码用于渲染编辑个人信息表单:
<template>
    <div id="profile" class="page">
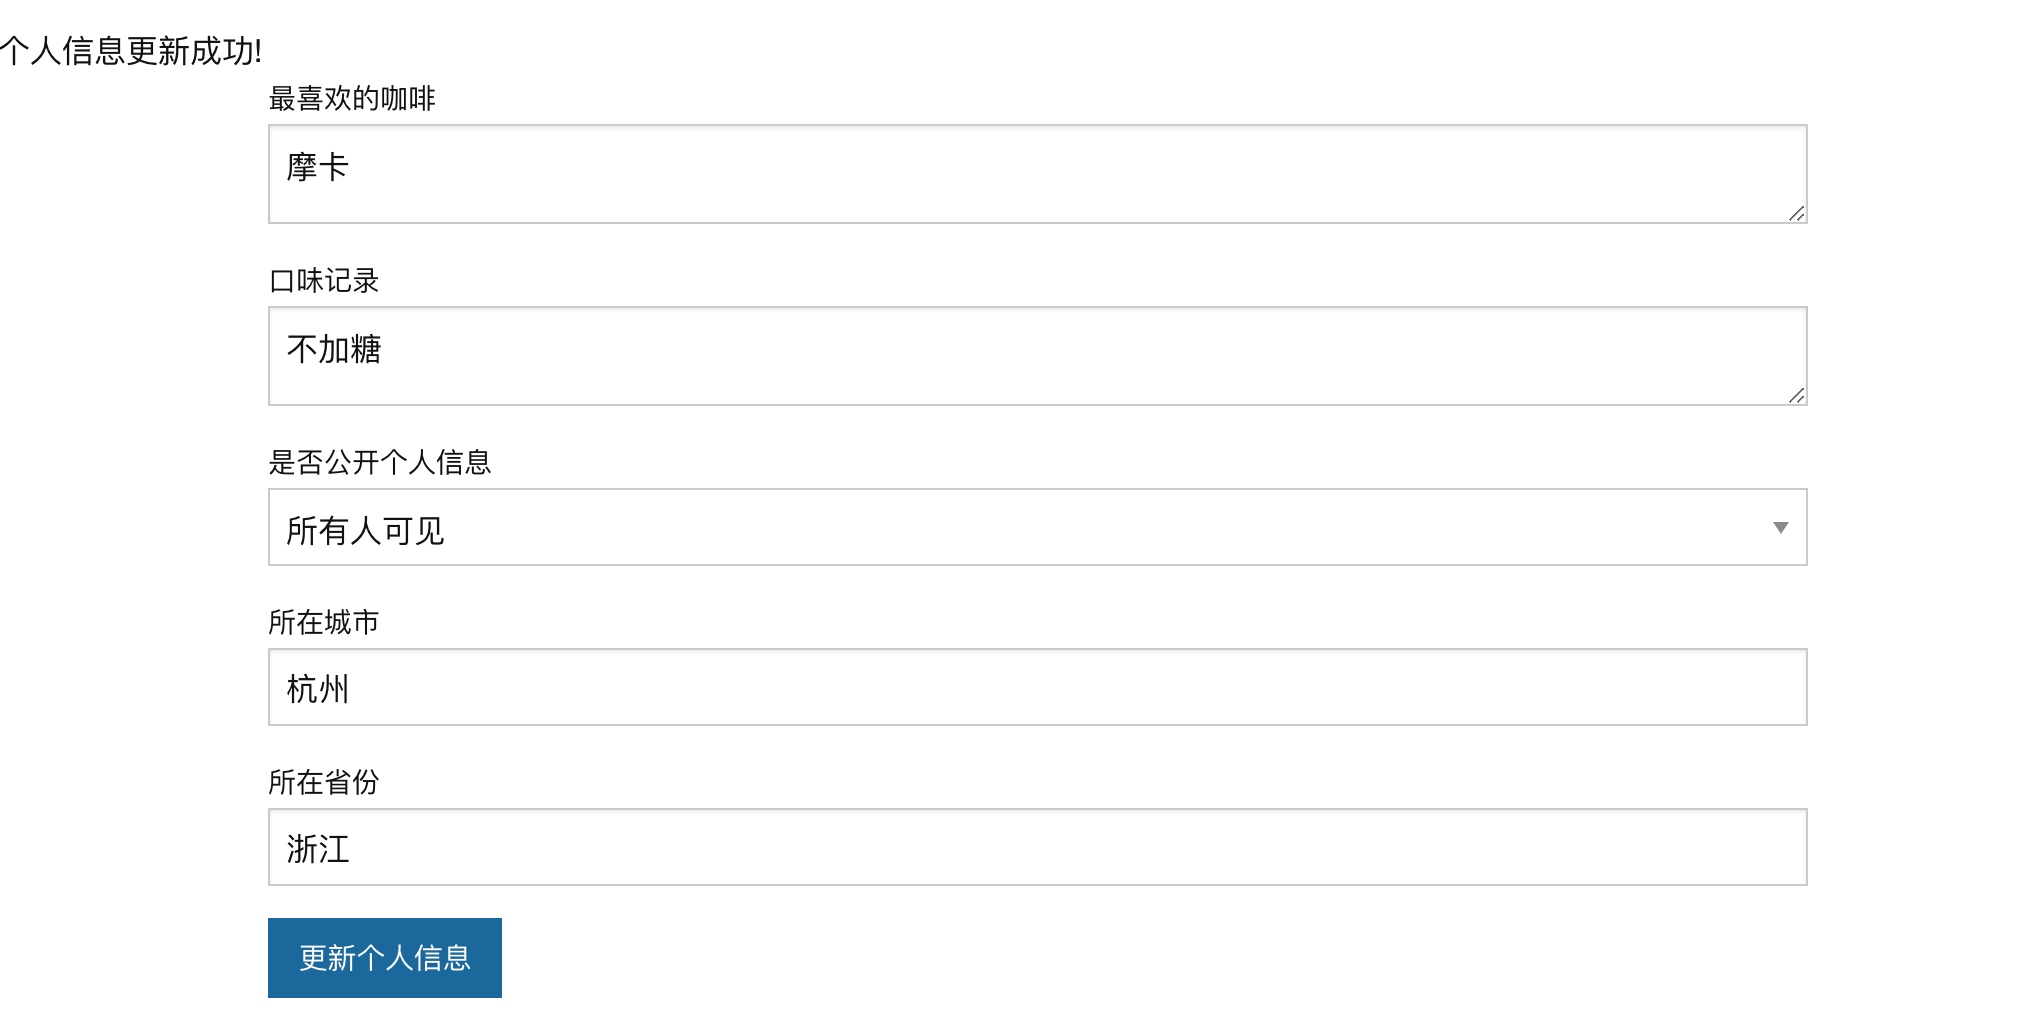
        <div id="profile-updated-successfully" class="notification success">
            个人信息更新成功!
        </div>

        <div class="grid-container">
            <div class="grid-x grid-padding-x">
                <loader v-show="userLoadStatus === 1" :width="100" :height="100"></loader>
            </div>
        </div>

        <div class="grid-container" v-show="userLoadStatus === 2">
            <div class="grid-x grid-padding-x">
                <div class="large-8 medium-10 small-12 cell center">
                    <label>最喜欢的咖啡
                        <textarea v-model="favorite_coffee"></textarea>
                    </label>
                </div>
            </div>
            <div class="grid-x grid-padding-x">
                <div class="large-8 medium-10 small-12 cell center">
                    <label>口味记录
                        <textarea v-model="flavor_notes"></textarea>
                    </label>
                </div>
            </div>
            <div class="grid-x grid-padding-x">
                <div class="large-8 medium-10 small-12 cell center">
                    <label>是否公开个人信息
                        <select id="public-visibility" v-model="profile_visibility">
                            <option value="0">仅自己可见</option>
                            <option value="1">所有人可见</option>
                        </select>
                    </label>
                </div>
            </div>
            <div class="grid-x grid-padding-x">
                <div class="large-8 medium-10 small-12 cell center">
                    <label>所在城市
                        <input type="text" v-model="city"/>
                    </label>
                </div>
            </div>
            <div class="grid-x grid-padding-x">
                <div class="large-8 medium-10 small-12 cell center">
                    <label>所在省份
                        <input type="text" v-model="state"/>
                    </label>
                </div>
            </div>
            <div class="grid-x grid-padding-x">
                <div class="large-8 medium-10 small-12 cell center">
                    <a class="button update-profile" v-on:click="updateProfile()">更新个人信息</a>
                </div>
            </div>
        </div>
    </div>
</template>
然后为 Profile.vue 这个组件编写样式代码:
<style lang="scss">
    @import '~@/abstracts/_variables.scss';

    div#profile-page {
        position: fixed;
        top: 0;
        bottom: 0;
        left: 0;
        right: 0;
        background-color: white;
        z-index: 99999;
        overflow: auto;
        img#back {
            float: right;
            margin-top: 20px;
            margin-right: 20px;
        }
        div.centered {
            margin: auto;
        }
        h2.page-title {
            color: #342C0C;
            font-size: 36px;
            font-weight: 900;
            font-family: "Lato", sans-serif;
            margin-top: 60px;
        }
        label.form-label {
            font-family: "Lato", sans-serif;
            text-transform: uppercase;
            font-weight: bold;
            color: black;
            margin-top: 10px;
            margin-bottom: 10px;
        }
        a.update-profile-button {
            display: block;
            text-align: center;
            height: 50px;
            color: white;
            border-radius: 3px;
            font-size: 18px;
            font-family: "Lato", sans-serif;
            background-color: #A7BE4D;
            line-height: 50px;
            margin-bottom: 50px;
        }
    }
</style>
最后是这个组件的脚本代码,首先为组件定义数据模型:
data(){
  return {
    favorite_coffee: '',
    flavor_notes: '',
    profile_visibility: 0,
    city: '',
    state: ''
  }
},
然后定义用户状态变更监听代码,如果用户数据加载成功,则初始化表单,如果用户信息更新成功,则显示更新成功提示文本:
watch: {
    'userLoadStatus': function(){
        if(this.userLoadStatus == 2){
            this.setFields();
        }
    },

    'userUpdateStatus': function(){
        if(this.userUpdateStatus == 2){
            $("#profile-updated-successfully").show().delay(5000).fadeOut();
        }
    }
},
在 Profile.vue 组件初始化之后,也会初始化表单:
created() {
   if (this.userLoadStatus === 2) {
       this.setFields();
   }
},
然后为组件定义计算属性,用于从 Vuex 模块获取用户状态数据:
computed: {
   user() {
       return this.$store.getters.getUser;
   },

   userLoadStatus() {
       return this.$store.getters.getUserLoadStatus();
   },

   userUpdateStatus() {
       return this.$store.getters.getUserUpdateStatus;
   }
},
最后,在组件 methods 中定义 setFields 方法用于设置表单模型数据(双向绑定):
methods: {
   setFields() {
       this.profile_visibility = this.user.profile_visibility;
       this.favorite_coffee = this.user.favorite_coffee;
       this.flavor_notes = this.user.flavor_notes;
       this.city = this.user.city;
       this.state = this.user.state;
   },
}
以及 updateProfile 方法用于响应「更新个人信息」按钮点击事件,当点击这个按钮时会执行该方法调用 Vuex 的 editUser Action,进而传递表单数据发送 API 请求到后端接口,实现表单提交:
updateProfile() {
    if (this.validateProfile()) {
        this.$store.dispatch('editUser', {
            profile_visibility: this.profile_visibility,
            favorite_coffee: this.favorite_coffee,
            flavor_notes: this.flavor_notes,
            city: this.city,
            state: this.state
        });
    }
},
我们简单实现上述 validateProfile 方法如下,这里,我们只是返回 true 表示不做任何验证:
validateProfile() {
    return true;
}
把验证逻辑延迟到后端去实现。至此,前端编辑、提交表单的功能也已经全部完成了。
第七步:添加链接指向个人信息编辑页
此外,我们还要在显著位置添加一个指向用户个人信息编辑页的链接,从而方便用户随时编辑个人信息,这个链接放到全局导航组件 resources/assets/js/components/global/Navigation.vue 中最合适,因为所有页面都能看到,在个人头像后面插入这个链接元素,并且定义为用户登录后才能显示:
<router-link :to="{ name: 'profile'}" v-if="user != '' && userLoadStatus == 2" class="profile">
 个人信息
</router-link>
至此,我们所有的编码工作就都完成了,运行 npm run dev 重新编译前端资源,登录后就可以在页面顶部看到「个人信息」链接了:

点击这个链接,就进入了个人信息编辑页面:

简单填写表单,点击「更新个人信息」按钮提交表单,页面会刷新,并且通过之前提交数据渲染表单,这就表明个人信息编辑成功了:


2 Comments
跟到这里,发现有两个小坑: 1,Loader没加载,需要在
Profile.vue引入Loader组件:然后在components中引入:
2;
UsersController@putUpdateUser接收参数为profile_visibility, 所以在...js/api/user.js文件中,传入参数应该为:经测试,可见状态由"所有人可见"变为"仅自己可见时", 修改不成功 修正如下:
UsersController@putUpdateUser中的代码改成:
更新信息之后,点了其他地方再点回来,用户数据并不会自动填入,修正方法为
this.setFields()方法放在组件完成渲染之后,即将Profile.vue文件中的代码改为